Find an easy step-by-step tutorial to transfer images using wax paper! This wax paper transfer tutorial is great for saving some money on costly transfer paper!

I have been playing around with a lot of mediums lately, one being iron on transfers. I had bought some the other day, but they are pretty expensive if you only make one item per sheet. So I thought I would try an alternative. The only thing I had around was wax paper, so I gave it a try and it worked GREAT! See how I transfer images using wax paper:

Here are a few things I took away from trial and error.
Supplies:
- Wax Paper (you can also use label paper
or freezer paper
)
- An ink jet printer
- A credit card
- And an object you want to transfer to. I chose to use a wooden pizza peel.
Get all the supplies you need HERE!!


TIP: I found that if you wet the wood a little, it would make the transfer darker. Just make sure it’s not too wet, then the ink will run (a happy balance).
To see my video tutorial for this wax paper transfer, check it out HERE.
Directions:
Cut the wax paper to the size of printer paper.

I used a graphic from The Graphics Fairy…she has the BEST blog!! Check it out for some really great stuff!
You will need to reverse the image. Most computers have the program Paint. If you aren’t sure just do a search for it in your start bar. Open the picture you want to flip, then go to Image in the top bar. There is a drop-down option for Flip/Rotate. That should reverse the image for you.
Put the wax paper in the printer and make sure it’s under the rollers, but not too far in. If you put it on top of printer paper, you can use the paper as a guide on how far the wax paper needs to be in the printer.
Stand close to the printer and help guide the wax paper out. OH, and make sure there are no wrinkles!! It can cause the wax paper to get jammed.

You will have to work quickly, but once you set the wax paper down you CAN NOT move it.
Try to line up the paper then gently lay it on the surface you want to transfer it to. Holding the wax paper firmly down, use a credit card to gently scrape the surface.
 Then carefully remove the paper. It will still have ink, so be careful not to drag it.
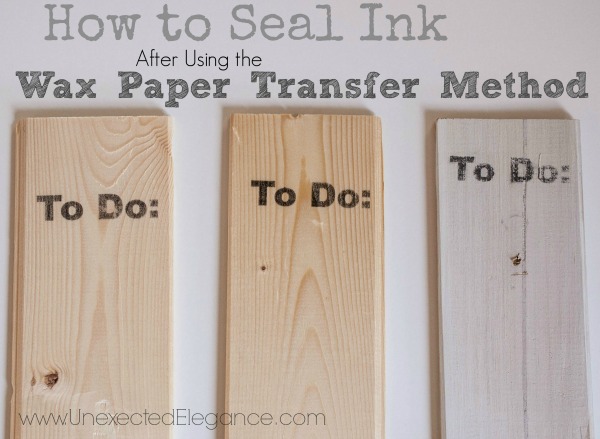
Here are the two sides of the board, the first one is without getting the board wet and the second one is damp. You can see that the second is much darker but the paper moves easily so it smeared a little. It all depends on the look you want.


This project takes about 10 minutes and is super cheap. I think I will be using this A LOT. It works on fabric too, but the thread has to be really tight for the best results.
For the VIDEO TUTORIAL of this project, check out this post HERE.
You can find out how to seal your transfer HERE.
************************************
And 7 WAYS TO AGE & DISTRESS FURNITURE HERE.
************************************

If this is your first time visiting, WELCOME!!! I’d love for you to stick around!! Connect with me through social media and join my mailing list so we can get to know each other better!! 🙂


Well, you did teach me something I didn’t know. I’m alwasy looking for new transfer methods. I think both sides of your board look nice. Thanks for sharing. (Found you at At the Picket Fence).
Can you do this type transfer with colored ink and canvas?
Thanks so much
G
Glenda, the colored ink will work. The tricky part is keeping the transfer from shifting, because it will blur. I would suggest practicing on paper first
I’ve printed onto white (or light) tissue paper (Tracing Paper also works) and then I mod podged it. Since the tissue paper//tracing paper is so thin the mod podge kind of seeps in and it does a wonderful job at blending it in with the canvas which can give it a painted effect. If you don’t want it to look painted then you must wait after you print your image for the ink to dry. Otherwise if you mod podge it right away the ink is spread a bit with the mod podge.
Excellent video, Thanks
Can you do this on painted wood? If so what kind of paint would you use on the wood? I am needing step by step direction as to how to do this. I see a lot of transfer directly to wood but need help to do it on a painted wood surface.
can you transfer an image on to canvas the same way? I am wanting ti make a picture way with the thin canvas squares. Ritterservices0920@gmail.com THANK YOU! JO
I would use chalk paint because if it isn’t sealed, it will be able to absorb the ink.
I buy my iron on transfers for projects at KRAFTYME.com
This wax paper trick is hands down a game changer! Just played around with it, and it works way better than you’d think. If you’re into transfers, maybe check out this cool Palworld breeding calculator 1.0.
Girl! Cheap and cool! Right up my alley! I love it! Love, Me
That looks so good. Great directions, too. I love old pizza peels and am looking for some truly old ones. Thanks for sharing at WOW.
Your board looks great! I’m always looking for new transfer methods, and you taught me something today.
I saw you on “You’re Talking Too Much” linky party…wow, I have some wood cutting boards & wax paper already, WOO HOO, Thanks!
I need some more followers on my blog too, If you follow me, I’d be very grateful.
Thanks,
Amy
Very cool project and great tutorial! I have one question, did you use an inkjet or laser printer?
Brittany
Brittany, sorry I forgot to include that! It is an inkjet printer. I will add that to my directions…THANKS!
~Angela
Definitely use inkjet. A laser printer will melt the waxed paper!
Ours is a Brother inkjet printer and it did not work…all it managed to do was make it where we needed to clean the printer about 5 times before we could manage to get even halfway decent copies out again. Thanks for the directions though. Enjoyed trying it!
Lorie, sorry it didn’t work for you. If you have any empty label pages with the waxy film, they work too.
What so you mean by a label page? Sorry I’m not sure what that is.
Pamela, it is the sheets that have sticky labels that you can print on from your computer. They are found with the office supplies. After you use the labels there is a slick backing that the labels were on. It’s very similar to wax paper, just sturdier. Hope that all made sense!! 🙂
label paper is the wax paper left over once all the labels are removed AND it’s already the correct size for the printer. Great way to use and reuse 🙂 I’ll have to try this.
Brother printers are WAAAAAY to weak to take on thin materials like wax paper.
Do you have to use a printer? It you just draw on the paper with a pen
I’m not sure what kind of ink you would need that would make a good transfer.
oops…i hv a laser printer and was so thrilled to try this but alas.
The article I saw said inkjet 🙂
The article said inkjet
I’m glad Brittany asked that question. So many transfers only work with lasers. Can’t wait to give this a try! I’d never heard of it and love trying new things. Thanks so much!
I suppose you would have to reverse print the letters so that they would transfer correctly?
Karen, yes you would have to reverse the letters. If you are using The Graphics Fairy, most of the time she has a transfer image attached.
how can you reverse the print?
Coriann,
That’s actually a common question!! I need to update my post. Most computers have the program “Paint.” If you aren’t sure just do a search for it in your start bar. Open the picture you want to flip, then go to “Image” in the top bar. There is a drop-down option for “Flip/Rotate.” That should reverse the image for you. Hopefully that will help!
~Angela
Thank you…. Once you said something I was able to figure it out right away! and the sad part is that it was so simple i dont know why i didnt figure it out on my own
Most printers have, once you hit file print, preferences they have an option to print as mirror. this is an easier option. Check your printer settings first.
You should add this tidbit to the directions. “Reversing the image” was my first question, and having never worked with transfers before, had no idea that there might be an option to download a “transfer image”, or even that you could reverse an image using “Paint”. Thanks for sharing, though…we’re moving to a new house that we have to renovate, soon, and I imagine I will be using lots of these kind of tips.
Kathy, I will add it to the instructions. Thanks!!
Hi Angela 🙂 if i have a laser printer can i use the empty label paper? i have a brother laser printer and made the mistake of trying to use inkjet transfer paper
Susie,
I’m really not sure about laser printers because I don’t own one. I know that it doesn’t work with wax paper, but I’m not sure about the label paper.
Sounds like an easy peasy project, Angela, and it has such a great result! Your peel looks wonderful. I had misplaced the tutorial I previously had for a transfer- this is easier. I’ll be sure to look for you at CL in a few weeks.
🙂 Sue
You are BRILLIANT! I can’t wait to give this one a try. Thanks for the great tute and tips, girl!
Great idea! You are a clever lady, Angela. I popped over from BJ’s blog. Glad to find you. I’m now following.
I’m interested in one of the cheese dome/plates like BJ bought. Do you still sell these?
~ Sarah
Sarah, that was the only one I had. If I ever see anything else like it, I’ll let you know!
Thanks for the transfer tutorial. I have yet to try this, but it’s on my list!
I am your newest follower and plan on linking to the Transfer Link Party this week.
Thank you for sharing.
Mandy
http://www.projectqueen.org
Hi, just found your blog. Loved your instructions! I have been wanting to try this. I actually liked both looks, the paler one looks very vintage. I am now a new follower.
definitely trying this! you’re a genius!! 🙂
That is a cool transfer method. I really want to try that on some things. Is it washable? I was thinking of using it on a rolling butcher block cart, but it would obviously need to be wiped off frequently.
Deborah, I tried it with water and it didn’t fade, but I didn’t use soap. I don’t know how well it would work on a surface that you use. If it is just on a part that you wipe periodically, it might work. You’ll have to let me know what you decide! 🙂
~Angela
Great idea, Angela. With a bit of research on sealants, I’m sure one can be found that would make the board usable for food (dicing, kneading, etc.). Okay, maybe not dicing and cutting, but certainly for kneading and such. I’ll have to check that out. I can’t wait to try this out. I make a lot of signs so this will definitely come in handy.
Would this work on t-shirts?
Christian, I haven’t tried it on t-shirts, but it worked on a tea towel. I havent’ washed it yet, though. Let me know if you try it!
~Angela
I tried it on a dish towel, works wonderfully, Bad news is it washes out. I wonder how you could set the ink, tried iron but that didnt work. Any ideas?
Dorothy, I’m really not sure? I wonder if soaking it in vinegar might help. (Not sure if it would bleed?) Sorry, I’m not much help!
I did this on my kitchen towels. I scanned some of my kids old artwork, transferred the image as she instructed, then traced with a marker to “set”. It was easy to transfer, washes perfectly and I have their artwork to keep forever. Hope this helps.
This is GREAT!!! I didn’t know about this!! I missed the transfer party. 🙁 The links were all gone for me to see, too. I wonder why? You have a fun blog! 🙂
Hi found you through Kathysue and you are brilliant! I love love love this idea and am going to give it a try. You make it look so easy, I just love the finished product, it looks like an old cutting board from a chateau in France!! Fabulous and so happy to discover your blog.
Stop by doing an amazing giveawawy for the most beautiful French telephone table!!
Wow , it is an understatement If say I love this project!On my list already!!thanks!
Hi I found you on Pinterest. What a great easy way to transfer. I had thought of wax paper before but never tried it now I will. Did you try it on painted furniture? Thanks for great tutorial I’m a new follower.
have you tried it on canvas? Just wondering if it works on other mediums.
I was wondering the same thing.
I haven’t tried it in canvas, but my guess is it would work. It hust needs a fairly flat and stable surface.
I’ve wanted to find a way of doing my own canvas prints as about the only place in my area that does that doesn’t always have the best quality prints and many of the employees in their place are apparently either not trained or poorly trained or something in printing canvas prints or don’t know how to adjust the settings on their printing machines. SIGH There are a few very good individuals who seem to really know all the ins and outs of their equipment but as a rule many don’t there.
Can you transfer photos to canvas with this method? Thanks!
I found this floating around on pinterest and followed the link back to here. I dont know you but I sure do love you for thinking of this. Muah!
omgosh..i am so super excited to try this…I have some wooden signs i want to make for my home. have you tried with different colors?or onto painted surfaces?
Great tips, I’m always searching for cheap easy ways to do transfers, I will be trying this out! Thanks
I love this idea!!! The boards are so cute!
XO
Kristin
Love this idea! Do you know if it will work on a painted surface?
I just tried this on a surface that I painted with Annie Sloan’s Chalk Paint. It worked like a charm.
I’m so glad!!!
Great idea! I love the rustic look 🙂
Would you have to reverse the image before printing it out so that the ink is on the side of the wood?? I’m confused by how it works but i love the idea! Thanks!! 🙂
Ashely, yes you have to reverse the image. Most programs have the option, but if you get the image from Graphics Fairy she normally has a transfer option.
Well, who said you couldn’t teach an old dog new tricks!? I found you through Kristen and I am your newest follower. I have a new grandbaby contest going on today (yesterday’s post) Pop by and take a guess if you have the chance. Hugs- Diana
What a great idea, I am going to have to give this a go. I was also wondering that you may be able to make the board more washable by using a heat gun and then the wax would melt into the board, not sure if this would work or not, just an idea!!
Sam, I was thinking that butcher’s wax might work. I haven’t given it a try, yet.
i’m in love with this idea…..thank you for sharing the tutorial as well….humm, something i’m going to consider trying. i love the way yours looks all gathered behind your stove & how convieniently accesible. oxox, tracie
Found you through Pinterest and I love it. I was wondering if it would work on wood that has been sealed or if maybe you could seal the wood over it?
Kim, I think sealing it would be OK. I haven’t tried it, but as long it’s clear it should work.
I hope you don’t mind, but I am sharing this over at my blog tonight – thanks for the great inspiration! Take care, Laura
To get the wax paper easily through the printer, adhere the wax paper to a piece of printer paper with repositional adhesive spray.
Thanks, Beth! I had thought about trying that, but didn’t have any at the time. I am assuming it will work with printing directly onto fabric, too? Have you tried using it on fabric?
How do you reverse the print? I’ve asked several people and none have been able to help me. I love this idea and cant wait to try it!
Gail, I had some trouble figuring that out too! Most computers have the program “Paint.” If you aren’t sure just do a search for it in your start bar. Open the picture you want to flip, then go to “Image” in the top bar. There is a drop-down option for “Flip/Rotate.” That should reverse the image for you. Hopefully that will help!
~Angela
Hi Angela,
Is this Pizza tray still usable? Or is it intended to be just for decoration now? How permanent is the transfer?
I was wondering if you sprayed it with Crystal Clear if it could be usable after wards.
Great idea, it is very cute. I was thinking this would be a good gift idea for my mom.
Thanks,
Laura
Laura, I had orginally made it just for decorative purposes. I tried sanding off the first one I did, and had some issue. I would say it’s pretty permanent. 🙂 I am not familiar with Crystal Clear, is it food safe? Good luck with your gift, I hope it turns out great!
~Angela
So smart & clever. Thanks for sharing …. found you via Pinterest.
Cheers!
Carrie
lifestylefilesblog.com
hmm..would this work for transferring onto plastic?
Brittany, I haven’t tried that!! Let me know if you do and it works! 🙂
~Angela
im giving up trying everything to put words on my plaques , ive got a plaque to make an nothing else works at all I don’t wana keep spending out now im gutted..i need to put treatment room on a white spray painted (matt)..would this work?? would the words be clear enough??…I have an Epsom inkjet would that be ok??..where do I get wax paper in the uk?
Sarah, I’m so sorry it’s taken so long to reply!! I’ve been on vacation. It should work fine, but I would practice on a scrap piece first. If you have freezer paper it will work with that too…just make sure you use the shiny side.
I tried this. The printer kept eating my wax paper. I even tried taping it to a piece of computer paper. Giving up. lol
Amber –
Try ironing the wax paper to a regular sheet. Just do the corners where you are not printing and put a towel between the iron and the wax paper. This will give the wax paper the heft of the printer paper.
Another idea – if you look into the printer from the output slot – can you see rollers? Is there a way to prop the rollers up with cut up zip ties? I have an Epson and to print on non-Epson paper (like transparancies) I had to use cut up zip ties to lift the rollers out of the way so they would not touch the paper.
In the case of the Epson there is a bar to wedge my tie on to lift the roller.
Anyway – I hope that makes sense and works for you!
First off, great tutorial! Thanks so much for sharing! Second I was reading a few of the comments and wanted to mention that I have printed directly onto fabric before using an inkjet printer (same idea cut freezer paper to the size of printer paper and iron the wax side to the the fabric then run it through) anyhow, it you soak it in vinegar, it sets the ink, but for some strange reason it only works on the black ink…the color inks dissolved off. about sealing the wood after doing this, lowe’s carries sealers in a spray paint and you can’t get either gloss or matte…I would imagine that those would be your best bet to keep the ink from running when you seal it…I don’t know how well they work because I haven’t used them yet, but just wanted to mention that they may be a better option that using a brush…anywho, sorry if those ??? were already answered by other readers…I didn’t read all the comments, but just wanted to throw in my two cents! Thanks again for the great tute!
So do you actually iron freezer paper to regular paper size fabric and then run through pinter as you would normally white copy paper? Will the reverse image automatically be transferred to fabric or will you need to iron afterwards. Wanted to ask before I try this. Let me know! Please and thank you.
btw I meant to say you ***can*** get them in the spray paint form…
Brilliant!!
Brilliant, Angela! Great tutorial – you make it look so easy. The pizza peel turned out beautifully, too. I found you on Pinterest and have repinned this to my Crafts and DIY board. Thanks so much, Lady!
xoxo
Joy
For those of you who still aren’t sure about how to print lettering in reverse – Most printers will have an option in the print dialogue box. For my HP printer, you click on Preferences (on the main dialogue box); Click on the “Finishing” tab, and then select the “Mirror Image” check box.
In Photoshop, you just transfer your image horizontally (or just the layer that your text is on if you don’t want any images reversed as well).
Hope this helps!
Looks like a great idea, can’t wait to try it,wonderful instructions also.
Thanks
Saw this on Pinterest! Very cool!
I really enjoyed watching this project. Very easy to follow instructions. Thank you.
Hi there! Just found your page through the graphics fairy =) I was wondering if this same technique would work with a laser printer? I don’t have an inkjet =(
I imagine that the wax paper wouldn’t even go through the machine. It would probably jam. Laser printers are pretty persnickety.
thanks so much! I am going to try this soon!
Thanks for this. I too have discovered the Graphics Fairy and really love her artwork. This week I used it for the first time on a miniature stool I found that already had old paint on it. I sanded it back to a shabby look and used the Mod Podge method to transfer the French letter design. I’ll try your method next time. To see the stool I made over, go to http://irestorestuff.blogspot.com/. Thanks.
Would this work on glass?
Jen, I havent’ tried it? My thought is it would wipe off. If you weren’t going to use water on it, it might work? Let me know if you try it!!
~Angela
MUITO OBRIGADA! ESTOU ENCANTADA! PARABÉNS!
I was unsuccessful with this project. Will have to find another way to do transfers.
Shannon, sorry to hear that! It can be a little tricky. Hopefully you will have more luck with some of the other methods! 🙁
I love this idea and can’t wait to try it. Does it matter which side of the waxed paper you use? Thanks for the idea and the great Graphics Fairy tip, she is wonderful!
Thanks for the info! I’m going to try this with fabric for my next custom made purse!
help me!!! I love this transfer via wax paper, and I finally learned today how to open it in ‘Paint’ to flip it…but now it prints so small, I’ve made several attempts to try and enlarge it via ‘Paint’ but it still comes out too small. but I can clearly see this is gonna work out, once I get the drift of it. thanks………..
Angela, I’m not sure what version of Paint you have but under “Image” there should be a “Resize” option. You should be able to increase the size with this option. If you can’t get it to work, let me know and I can do it for you! 🙂
Just shoot me an e-mail: unexpectedelegance@gmail.com
~Angela
I did this! And I recomend NOT doing this in a laser jet! I absolutly ruined mine. My husband explained that laser jets heat up SO much that the wax melts and then hardens in the rollers. We have now bought a ink jet so we will see. I am a little hesitant though!
Just tried this on an old wood cutting board and it came out awesome! Thanks for the great idea! It was super easy to do!
I’M SO GLAD!! I’ve heard lots of people tell me how it didn’t work and I was getting worried that maybe I shouldn’t have posted about it. Thanks for letting me know and I would love to see a picture if you get a chance. My e-mail is unexpectedelegance@gmail.com
~Angela
had a question…love this idea and have tried it several times….the ink always bubbles on the wax paper and no matter how careful i am it smears badly on dry or damp wood….so much that it doesnt look good at all….am i doing something wrong? anyone have any ideas??
Leigh, I’m not sure about the bubbling. Are you using an ink jet or laser printer? I have heard that laser printers get too hot (might be the problem?). The smearing is something that is pretty tricky. I normally hold the paper at top and bottom and slowly lay it down, top to bottom. If you have someone to help, hold it securely as you lay it down and have the other person scrap it with the card. Hopefully, that will help!
~Angela
Thanks for responding!!
we have an inkjet printer, its a few months old if that has any bearing on the way it works….i get alot of bubbles on the surface of the paper, maybe if i am just extra careful i can transfere the image without smearing! I really love this idea!!
maybe try printing on “Draft” You should get less ink that way.
Awesome idea! I can’t wait to give this a try. I have been very disappointed with the Citri-Solv method. I hope it will feed through my printer. . . I have one of the newer one that does not allow hand feeds. 🙁
I’ll cross my fingers for you!! 😉 Let me know if it works, I am looking for some successful projects to feature!
~Angela
I am guessing that you will need to print your graphic in mirror reverse if it word at least right? Love this btw!! I will be trying it out soon!!
Yes, you will have to reverse the image. I would love to know how it turns out!
~Angela
Wow, the print looks amazing! I’ve never seen this before and am pretty excited now to try it out! Thanks so much for sharing the tutorial. 🙂
You’re welcome!! Let me know if you try it!
~Angela
Did you try this on glass?
Doris, I haven’t tried it on glass. My thought is that it won’t stick because the surface needs to be porous…but it’s worth a shot! Let me know if you decide to try it!
~Angela
Not only does it work on glass, it’s the best method I’ve used yet. Just replace water with cheap deodorant.
Love this! Thanks for sharing.
Thanks Mrs. Limestone!! I was so happy to see your comment…it made my day! 🙂
I loved this idea, but I was having a lot of trouble with the waxed paper not feeding through the printer. After several tries (some of which worked fine but others which jammed up the printer), I found a solution which is easier to work with AND foolproof. I took a sheet of clear “overhead” printer sheets (teachers use them to print something for students to see on an overhead projector). It is rough on one side and smooth on the other. I printed on the smooth side. Perfect! And the ink washes off so it can be re-used!
Thanks for trying it out! I have used transparencies too, but this is just for someone who only has household things and no budget!;) Sorry, it didn’t work out for you!!
I love this and must try it! I’ve printed on fabric before and I taped the fabric to a piece card stock to stabilize it. Worked perfectly.
P.S. I hope you don’t mind if I add it to my Pinterest board. If you do, let me know and I will take it down.
Maureen, I would love for you to share it!
Thanks!
Angela
Have you ever tried this on glass?
I haven’t? Not sure about it drying? Let me know if you try it!
~Angela
Theres a better way…use regular printer paper…reverse the image before you print (print options) Place paper on wood or what ever you want image on. Tape in place. Brush paper with wet paintbrush… enough to wet but not to tear paper. Then take sharpie pen CAP and rub transfer – gently not to tear paper. Go in both directions with cap. I can email u a pic of the wooden plaques I did. Not to dark, not to light. No smearing. Perfect !
This method did not work for me. I tried 2 different printers and the ink isn’t coming out dark enough on my wood. I can’t wait to try the wax paper method
Have you tried this on painted furniture (or any painted surface)? I would like to transfer an image to a painted table top
Jeanne, I haven’t tried it but I know it’s possible because others have commented about doing it. good luck with your project!
~Angela
Hi! This is great – remember doing something similar as a child. That was many many years ago. Anyway, you are so artistic, wondering if you know a technique such as this that would transfer onto glass? I am working on a project and need something really vintage looking on a picture frame glass. Well, best to you and your artistic endeavors! Lorane, txwoodcarver.
Lorane, I don’t have any suggestions for glass. I know you can buy glass paint. If it’s an image you could paint, you could just put the image behind the glass and trace it in paint. Good luck! Let me know how it turns out.
~Angela
I love this! Will definitely have to try it!
Jen, let me know if you do! 🙂
ok i know i am a bit late to the party but i have been decorating my sons room and wanted to see if it would work on a wall over paint (just for the ‘stencil’) and then paint over the top of it just so that its right…before i try it do you think it may work??
I haven’t tried it myself, but I’m pretty sure it work. That might have to be my next project! 🙂
I tried this and gave up on trying to get the wax paper to go through my inkjet printer. Instead I printed it on my regular computer paper (reversed) and put it on my wood cutting board. I took a wet washrag and put it on top of paper like you would a temporary tattoo. Then I took my iron on the highest setting and went over the rag until was almost dry. The results were about like your paddle without water. Even though the methods weren’t exactly the same I still wanted to thank you for giving me the idea. I love my new cutting board!
Sabrina, I’m so glad you found a way to make it work! I know some other people have had trouble with this method too, so it’s refreshing to know you worked through it!! 🙂
My printer ate up the wax paper. I can’t imagine it doesn’t do that to everyone. I also tried the regular paper, wet cloth and iron method and nothing. Im getting frustrated bc i have a graphic i need to get placed on a painted table. Any more suggestions? THANKS!!!!
I’m sorry, it’s not working for you! Freezer paper or a transparency is the only other thing I can suggest. Here’s a link from someone who used a freezer paper method.
http://home-frosting.blogspot.com/2011/08/before-and-after-nightstand.html
Let me know if you get it to work! 🙂
~Angela
What IS freezer paper? Isn’t it just wax paper?
Sangria, it’s a little different. It’s white and heavier, but still has a shiny side.
Do you print your image on the waxy side or the paper side??
Linda, yes on the waxy side. It take a while to dry, so that is how you are able to transfer it. Hope it works for you!
Hi – looks perfect, but where do you buy the wax paper ? Is it something special ?
I’m not sure where you live, but wax paper is sold in our grocery stores. It’s used when baking. You could also use freezer paper. The surface just need to be slippery, so the ink won’t dry too quickly.
Thanks for stopping by!
Angela
Wax paper continuously got jammed in my printer. Gave up on this because we just bought this printer and I wasn’t about to break it. 🙁 Bummed.
That stinks!! Sorry it didn’t work, I guess it all depends on the printer. I have a really cheap one! 😉
You can inkjet print directly onto fabric. Just iron the fabric onto freezer paper…. this will give it the body it needs to go thru the printer. Print. Peel off the freezer paper and viola!!! I always press with high heat to make the image permanent. No need to reverse images!!!
Thanks, Ann!! I will try that!
~Angela
I suppose you have to use a specific side of the paper for it to work properly?
Karen, you want it on the waxy side. Hope it works for you!!
~Angela
my sister and I tried for hours today to get a method to work using freezer paper, waxed paper, etc. My inkjet printer would just shoot out the transparency with nothing printed on it. Waxed paper had same results. freezer paper would not transfer.
what are we doing wrong?
Gena, I’m not sure? It’s pretty weird that nothing is on the printing on the wax paper or transparencies. The only thing I can think of is it might be a setting, but if it’s printing the same image on the freezer paper, I’m stumped.
Hello, first thank you for posting such a great tutorial. I have a question though. I did try this the other night and my image barley transferred to my cutting board. Does it matter which side you print the image onto the wax paper? I ask because mine didn’t turn out very well, wet or dry, (I did it twice) and wondered if I perhaps printed on the wrong side.
Thanks!
Dana,
I’m not sure why it’s so light? The wax paper should be waxy on both sides, but if for some reason yours has one side that is slicker, I would use that side. When I did mine, the ink stayed very wet for a long time. It might be the amount of ink your printer puts out, too? Sorry, I’m not much help!
I shall have to try this, it looks really nice. Thank you..
This is a great idea!! Can you seal it and what with so is doesn’t wear off.
Lori, you can seal but if you use a spray sealer it might run. I would use a butcher wax.
The first one I did I tried to sand it and it wasn’t coming off, so you might be OK?
Good luck!
~Angela
I love this idea! Is there a way to do this using a laser printer, as I do not have an inkjet?
Christa, I haven’t tried it on a laser but I’ve read some comments that say it doesn’t work. Sorry!
~Angela
You can actually print on fabric with an inkjet printer if it is cut to paper size and ironed onto freezer paper (waxy side). Both should be the size of a piece of paper. Once the fabric is printed, pull off the freezer paper and iron the back side of the fabric with a warm (not hot) iron. You will want something under the fabric when you iron it “in case” some ink comes off. I’ve not had that problem. My mother makes quilts using this technique. She gets some really unique fabric this way.
Thanks, Robin! That’s a great to know!
i tried ironing to set the ink and it washed out…someone told me to let the ink dry for 24 hours before washing….going to give it a go….for items that are transfered onto wood if you use a butcher block sealer it is food safe and washable….i use the brand Watco, its oil based so clean up is with mineral spirits, but that is what makes the item washable afterwards….love it……
Is the ink permanent (won’t wash or rub off) or does it need to be “sealed” with something? Found your link on Pinterest!
how is this when something is washed? does the ink smear at all?
You might want to try this method. Use an Avery Label Sheet instead of wax paper. First you will want to remove all the labels and borders. Your graphic should transfer to the label sheet by feeding it through your inkjet printer like you would if it were regular printer paper. Once your graphic is printed on the sheet, lightly wet your subject with a sponge. You should be able to burnish your picture onto the surface with the back of a spoon or credit card. (I haven’t tried this yet) but if it works, it might be easier than using a sheet of wax paper that may get jammed in the printer. (*note – use that slightly damp sponge to remove any remaining ink that remains on the avery label sheet and reuse. Good luck! I hope this makes sense.
I am excited to try this, I have a question about after you print on the wax paper how long do you have to transfer the image? Do you do it while it is still wet, or do you let the ink dry? Also I tried another method using freezer paper. I had a couple pieces of wood to play with. I found that the piece of wood that was smoother worked well. The other piece that was a LITTLE more rustic did not work at all.
I really love that you take the time to answere all the questions.
Found you on pinterest.
Kathie, I haven’t done this project in a while but from what I remember I transferred it right away. Hopefully it will work for you!
~Angela
Thanks for the tip. It is Fabulous!!!!
Lynnae, you are welcome! 🙂
What a great idea! I have two projects that have been sitting in my head for a while now. I now know how I will do them. Thank you so much for sharing. I love what you have done with your kitchen. Looks great. I will be stopping by more often!
wanted to let you know you can also do a transfer with copy paper. You get your transfer picked out and under your print properties select the mirror image and print. then u wet the wood. Not too wet just little more than damp. lay your paper down image side down. wet the paper but just a little more than damp. take the nose of pen cap and trace the transfer. press hard but try not to tear the paper. Lift transfer off and there it is.
Kalie, thanks for the tip! 🙂
Thanks so much for this tutorial. I was trying to do another method of wetting the paper, but wasn’t having any luck. It took a while to get it printed on the wax paper without it coming out of the printer smudged. At one point, I ran out of black ink. Even though it printed using other colors, the ink came out in little droplets instead of one smooth image. I read above that someone else had that problem. I would check on the ink settings. At first I tried wetting the wood, but it bled too much. Working with the painted and then sanded dry wood worked perfectly. Thank you!
Neesa, I’m so glad it worked for you! A lot of people have trouble. My printer is so cheap, but it works great! 🙂
OMG this actually worked! I put a vintage Costa Rican stamp on a cutting board from Costa Rica and it looks fantastic. Thanks so much for posting this!
Jennie, I’m so glad it worked for you!!!!
I saw in your instructions you have to work fast. Does this mean you cant make the transfer ahead of time and store them? I have a craft party coming up and have ideas for people to do small crafts at different stations and thought this might be kind of fun. But if i cant let the transfer sit it wouldnt work.
Kasi, I’m not sure how well they would “keep?” My best suggestion, would be to try a small image on a scrap piece of wood in advance. I would love to know if this works for you!
Thanks!
Angela
This is brilliant!!! I will be trying this very soon!!!!
Came across you via The Graphics Fairy. Absolutely amazing idea (and thrifty too). Thanks so much for the tutorial!
Alex, thanks for stopping by!!!
Hi! Great idea. I was wondering which side of the wax paper should be facing up when running through the printer.
Danielle, whichever side is the shiniest/slickest. You just want the ink to not stick to it. Hope it works for you !
Hi! this is a brilliant idea, but i was wondering what font you used for the word “cafe”
Jordan, I got the whole graphic from the Graphic Fairy’s website. You can always Google fonts to find free ones that might work, if you need something specific. Hopefully I helped! 🙂
Does anyone know if you can apply lacquer or polyurathane over the ink without it smearing?
Allison, I haven’t tried it but I think it might bleed. A paste might work?
Hello Angela,
Thanks so much for the great tutorial. I found you via The Graphics Fairy! I’m now a new follower and hope you’ll stop by for a visit and join my Frugal Treasures Tuesday party. Hope your weekend is going well.
Barbe
Worked perfectly!!! Thanks for the awesome tutorial! So glad I ran across your site and I can’t wait to spend some time exploring all the cool things you do!!!
Tried it…. jammed my printer. Tried to tape it to paper… jammed my printer. Tried to iron it to paper like you mentioned… didn’t work. Any other suggestions?? I would love to try this. Most transfer methods I’ve seen require a laser printer, and I have an inket…. so I would love if this worked. My printer you have to feed from the bottom, so I cant hand feed it… suggestions??
going to try now . I have just found you on pininterest. Thankyou
OMG I haven’t seen this before! Very cool! It makes me want to run out and get wax paper right now! Do you think it would work on a cutting board? Would it get too cut up? What do you think? Have you tried it yet? Love your site! Here is mine!
http://www.thecraftysailorwife.com
Does this work with color ink as well? I want to put sepia toned pictures on wood and the only way I know to do this is use transfer tape or packaging tape and soaking the paper in water. To do this, I have to use toner ink. Has anyone tried this with color in using color ink from a regular home printer?
The best transfer method I’ve used (and have tried them all). I’ve used this on plain wood, painted surfaces, clay pots…I love it!
I seal the transfers on wood with paste wax. You can also use a spray sealer such as clear Krylon spray paint. On fabrics, I use a hot iron to set it. Before you wash, you can mist/spray vinegar directly onto it to help keeping it from fading.
Thanks for the great tip!
Have you ever tried to use scrapbook velum? It is heavier and would go through printer easier but didn’t know if it would work or not. Thanks for posting such a cool idea.
Donna
Can I stain on top of this or will it run?
I tried this and it worked GREAT. So super easy. Just hoping it will stay if I put a coat of stain over it?!?!
Randi, I think the stain will make it run? I would use the stain first then do the transfer and if you need to seal it, use a wax or paste?
I tried this method to make a tray for a friend’s wedding…. But the concern I ran into was the ink would get smudged during printing and there weren’t clean prints to actually use. Any tips/ideas? I tried doing “best quality” “fast draft” etc and nothing helped.
Michelle, I know some people have trouble with different printers. My only suggestion is to try to clean the rollers if you can. My guess is there is ink on them and it’s transferring to the wax paper? I’m not sure if that’s the case, but I can’t think of any other solutions? Good luck and I would love to know if you get it to work! 🙂
Ok, this inspires me to ask a question ….
I’m doing my backsplash in beadboard wallpaper. If you’ve not used it or are familiar with it, it’s thick and has a sort of foamy texture. I plan to paint it with a high quality enamel to seal it well. I would love to stencil something on it, as if it were old wood that had been stenciled years ago. A transfer would certainly be more affordable and a much larger selection (graphics fairy has everything you could ever want. ever.) but I’m wondering how much pressure you used with the card? I’m afraid the wallpaper would “dent”. Is there another transfer method I could use?
I thought about a projector and tracing it, but I want it weathered and somewhat faded, like the transfer would be.
Beth, depending on how well your printer works with the wax paper you could probably make it work. The less pressure the more it will look “aged.” I would definitely try it out on a scrap before you do it on your new wall, but make sure when you test it you are using the same angle. My worry is it will be harder to do on a wall. Definitely do it with another person and painters tape might be good to keep it from slipping. I’d love to know if you try it!!
Hey i’ve been looking for a cheaper version on how to transfer stuff and i will definitily be trying this but just curious can you wash the item you transfered onto after and it won’t come off?
Anna, it won’t come off on wood for sure. I’m not sure about fabric?
I just tried this and it worked great! I made a toy box from an old wine crate for my dog and matched the fonts in the original design. I love it, thanks!!
Love this method but it kept jamming ing the printer so I tried parchment paper. Worked worlds better! You should try it!
I’ve used a similar method to transfer news paper print to a nail ,, wonder soaking the wood (surface) would help to minimize the smearing
** soaking the wood surface in alchohol
How do you seal it? Thanks!
I’m so excited about using this method. I wonder if it would help to leave the wax paper on the transfer object for a few hours to let the image dry.
YOU are Awesome!! I too have been looking for something like this. I wanted to make my own Marine shirts cause our oldest in right now and we have 7 kids and wanted to make t-shirts. Also I love vintage looking signs. Any advice about the transfers for t-shirts PLEASE let me know. Thank you Stef
LOVED this idea, I was so happy to find it since I had been working on some signs that I found at our thrift store, and I could never find the perfect method to have the decorative type on my signs… I also wanted to say that my transferring worked on a painted surface just fine. I tested it first on the back, but the text came out nice and dark, even over the paint. 🙂 Thanks again!!!
Everyone that is having trouble with the wax paper…do this instead: Take any of your Avery or other brand label sheets and peel off all the labels/borders. You are left with a wax paper with paper backing that fits and goes perfectly through the printer. Still just for inkjets, no laser.
I have tried it with avery clear transfer paper, with the clear sheet still on it and my printer just spit it out…….I will try by peeling it first……pray it works
Sangria, sorry it’s not working! It sounds like your printer is refusing to cooperate! 😉 Hope it works for you soon!
This is a great idea! I am going to try it on a t-shirt. Do I need to wet my shirt first, as you did the wood as well? (:
Lisa, when I tried it on fabric I just got a damp cloth and patted the surface I wanted to transfer it to. It was barely damp. It worked well for me, but I haven’t tried t-shirt material. I would try it on a scrap first just to be safe.
Is this waterproof??
Jennifer, on wood it will not was off with water. On fabric it fads. Hope that helped! 🙂
I’m wanting to do this on a guitar pick but would I need to seal the print with anything so it doesn’t rub off onto my fingers?:Px And if so what should I use?
Emma,
If the pick is made of wood, once it dries it shouldn’t come off. If the wood you are using has a finish on it, you will need to sand it pretty good before you use the transfer. If the pick is plastic, I’m not sure if this will stay permanently. Hope this works for you!
I found your site through The Graphic Fairy DIY site. I have an old antique wood chair that had the seat caned (ripped out years ago) so I cut plywood and covered it with foam, batting and a cream and black checkered fabric, now I want to use some of Karen’s great graphics and some old black and white photos transferred onto flour sack pillows to sit on my cute new chair! Not to worried about washing them, because the older they get the better they will look! Thanks for sharing this great tutorial!
Crafty Hugs,
Pendra
pendrasplace.blogspot.com
Do you have any ideas on how to use an iPad to get an image and reverse it? Thanks, great idea.
Mari, I’m not sure about images in general on the Ipad. I only use mine for internet and generally stay away from even typing on it! 😉 Sorry, I’m not much help!
This didn’t work. I tried it over and over and over last night, and the results were consistently horrid. I have an inkjet printer, the images print okay on wax paper, then they are either way too light on the wood, or they blur, or they smear, or only parts of the image transfer, or a combination of the above. I tried wetting the wood different amounts, not wetting it, printing with different amounts of ink (draft, regular, high quality, everything), trying color ink, using black ink only, printing on both sides of the wax paper to see if that made a difference, transferring the images right away, waiting a while to transfer the images, everything I could think of. I wasted $20 worth of little wood pieces from the craft store trying to get even just one halfway decent image. Just awful.
Laura, I’m sorry it didn’t work. 🙁
Laura – That sucks for you. I tried, followed the directions exactly and it turned out simply perfectly! I am actually doing a series of these for little Christmas gifts with amazing vintage graphics from the graphics fairy. I even did multiple images on uneven, rustic reclaimed wood planks that are stained a dark color and it still turned out amazing every time. I just followed the directions exactly. You’re clearly doing something very wrong!!! It’s super easy! Are your hands really shaky or something? Do you move the image around after you lay it down? It’s truly quite hard to mess this up. Your failure at this project is obviously not a reflection on the writer’s tutorial… which is wonderful, clear, concise and simple to follow. Thanks for the great instructions!!!!
– a different Laura
hi, i was thinking about doing this on some big letters for my sister for christmas, but the letters are painted..
i was wondering if this idea would work on painted wood, or does it work just on plain wood?
thanks
Lauren, it should work on painted wood. Some people have had trouble with how dark it comes out. I would just test it first on a piece of scrap or an area that won’t matter if it gets messed up. All printers are different! 😉 Good luck!
This is a cool idea – I didn’t read all the comments, just enough to see that people were having trouble with the waxed paper jamming in their printers. You could try taping the leading edge of the waxed paper to a normal sheet of paper and then feed that through the printer.
I enjoy your blog!
I was just wondering how the transfer held up after it was dry? If it gets wet does it come off? Can you use the cutting board? Love the Idea and am going to try it. I just wanted to know
Stephanie, on the pizza peel it never came off or faded. The wood didn’t have any finish on it, so I’m not sure if it has a finish how it will hold up. I just used mine for decorative purposes, so I’m not sure how food safe it would be. Hope some of that helped! 🙂
~Angela
Hi, I am trying this on a project and wanted to see if once I print it on the wax do I have to transfer immediately or can that part wait a day before transferring. I want to print it at home but then would go to another location to transfer. Sounds strange, I know but it is a Christmas project for a family member! Thanks
Carol, I haven’t tried it this way. My only suggestion would be to do a test run. Use a smaller version on a piece of scrap material. Sorry, I’m not more help!
Wahhhhhhh….it didn’t work!!!! I got all the way up to loading my wax paper in my printer then i hit print…….and it jammed over and over again!! I even taped it to a blank sheet of paper and wahhhhhhhhh it didn’t work! I even bought those clear transfer papers at staples and it too just got swept up by the rollers of the printer and got spitted out without printing anything on it!!!! The print that I have is quite detailed and so this is the best method I think to get all them pretty details on my cabinet door cuz there’s no way imma trace it all with a sharpie no thanx! Is my project doomed!!???
Signed,
Desparately seeking transfer method
OK…..OH….MY….GOD!!!!! There was a person that commented on here to spray adhesive on a regular blank sheet of paper and paste the wax paper onto it…then cut the edges to make it even with the paper width. CAN I JUST SAY “THANK THE GOD LORD THAT IT WORKED!!!!!!!!” All my frustration of spending 4 hrs the other day is gone and now this is easier than ever! And on top of it all….it transferred so dark enough onto my chalk paint painted cabinet doors that I won’t even need to go over it with a sharpie or black paint! I’m freaking out is so good!!! Seeing that I have an addictive personality….I’m gonna do this to EVERYTHING in the house!! ANGEL-A u awsome lady u!!!! Thanx so much for making the effort to post this and show us ur wicked pizza board!
Dang. Wish this worked for transfering to glass. I mean it transfers, but it always wipes right off the glass. LOL
found you on pinterest! i wonder if this would work on wood letters (without finish or laquer) and transfer black and white photos… i know color wasnt working too well for ppl up above but did anyone try actual images instead of just letter? i know images work well with the nail polish transfer method.. i wonder if this method will do the same? anyone try it? let me know 🙂
I haven’t tried images. My suggestion, would be to do a small version on a scrap of wood. Hope it works for you!
~Angela
Hi! I am wanting to transfer onto a cheap folable white box (you know the kind you rush to get at the dollar store at Christmas time to get the job done) I am a college student and can’t afford to get canvas for the transfer I would like to do and thought using half of a gift box would be a cheap alternate……will this method work on things other than wood?
Lexy, I think it would work. It will all depend on how slick the box is. Hope it works for you!
Will it work on fabric if you use a color image? Like maybe a US flag or something in color.
Randi, the colored ink does not wash very well. If you are doing a project that doesn’t need to be washed, it will probably work.
would it work the same if you used a shirt? please blog on that! thanks!
Amber, it works on some fabrics. It will need to be a very tight weave. I had actually started working on a post a few months ago about using this technique on fabric. I guess I need to finish it! 🙂
Hi Angela,
I just discovered you and am excited to play around with transfers. Have you done anything on tin or tin cans?? Applying heat would be tricky. Would you paint the surface first? Acrylic paint?
Thanks!!
Just a FYI…my daughter and I could not get this to work – the wax paper would not go through the printer at all until we attached it to piece of printer paper…then WAAAA-LAA!!!! Went through first time! Now, here’s to hoping we figured out which side of the wax paper was the right one 🙂
Thanks Angela for the great tutorial! I referenced you in my blog if you want to check it out!
http://loftymoments.weebly.com/1/post/2013/01/diy-wall-quote-using-wax-paper.html
THANKS!
FYI …. I do not recommend anyone with a Kodak All in one print try this. I did it and it ruined my printer. I had to go buy a new one. The wax from the wax paper sicks to or clogs the printer head. My printer was working fine before I feed the wax paper through it and then it wouldnt print anything after I did it. Just a blank page. I replaced all the ink cartridges twice with new ones even took out and cleaned the printer head. Nothing worked, so Im just giving a warning!
Thanks for sharing – great technique!
Hello Angela, it’s really nice to see this thread is still so alive!
I have been loving image transfer forever and since Polaroid no longer makes my beloved 669 (and there are just NO substitutes ), i’ve been playing with different transfer techniques. This one is full of potential for my work and I’m so excited. Your tutorial is succinct, beautifully shot and very well written. I have tried this method with two of my printers, with no success (yet!). I’m not sure if I missed it somewhere but may I ask which printer and inks you find works best for this technique? Thanks Angela, and when i do get some interesting results I’ll be sure to let you know.
Megan, I have a very cheap printer. It’s an HP Deskjet 1000. (I think it was under $30.) The only other advice I have is to try using the Avery label pages. After you have used all the labels, save the backer. It has a wax finish on it and is sturdier than the wax paper. You can reuse it a few times, too. Just wipe it with a damp paper towel.
Good luck!
Angela
what side of the wax paper do you print the image on?
Carrie, you want to print on the “waxy” side. The kind I used, it seemed to work on both sides.
Can you do this on painted wood?
Connie, it does work on painted surfaces!
Hi Angela! What a great project, I can’t wait to try it! Do you think that if I use a double sided tape it might keep the transfer from moving and smudging? I’ll give it a go and see how it turns out 🙂
Melanie, I think that might work. The whole trick is not getting it move, so laying it down carefully is the most important part. Let me know how it works!
Angela
Loved this idea! The wax paper did not work for me unfortunately. But came up with an idea that worked beautifully! I used a ‘sheet protector’ left over from my childrens school projects. I placed a piece of typing paper in the sheet protector and had to trim the the one edge that had the holes in it (exactly to the size of the paper). I then taped this side – top, bottom and middle. Ran it through my printer and it worked brilliantly! I ran the credit card over it and wha la! Took a paper towel and was able to wipe off it off and now can re-use it!
Tammy, that’s awesome! Glad it worked!
Tried this tonight and putting the wax paper by itself was a bust. Then I used spry adhesive to glue the wax paper to printer paper and had no problem! I used some French typography on some old chippy boxes I had painted, sanded, painted, sanded, added crackle, painted and sanded one more time and they look fantastic. I dampened the surface slightly first so the ink would be darker and it was just right. Thank you so much for the tutorial!
Just wondering if any of the wax rubs off… I’m wanting to stain the wood after the transfer, and I’m afraid if the wax rubs onto the wood it will not accept the stain. Has anyone tried this?
I know other people have stained over the transfer and it worked fine. I don’t think you would have any trouble, but you might want to test it first.
Hey there. You are probably getting tired of answering questions on this topic..BUT:
I am wondering if it makes a difference on how the paper is fed through the printer? Some home printers have the drawer underneath, and others you stack the paper horizontally in a tray. That is probably one of the reasons why this works for some but not others.
My printer has the drawer, what type do you have?
Lora, I have a printer that feeds from the top. It probably will make a huge difference! Mine, I can make sure it feeds into the printer, and you probably won’t be able to do that with a drawer.
I found you on pinterest and knew I would use this idea for a classroom auction project. I had all the kids draw pictures of them selves and then scanned them in, printed them on was paper (just taped the top edge to (cardstock) and rubbed them on a small toy chest. It was so easy! Thank you for sharing your brilliance!
April, I’m so glad it worked for you!!!
Can you do this on fabric as well, and then trace it over with fabric paint/marker to make sure it stays permanently??
Adrianna, I have had it work on fabric. It works better with a tighter weave.
Has anyone tried this on a tile? I have a smooth, porous tile (like sandstone) that I would like to transfer to. It is about 4″ round. Would it be hard to line up the print with the tile?
I haven’t heard of anyone trying tile? If it’s porous enough it would probably work. Let me know if you try it! 🙂
Saw on one website where they were using parchment paper rather than wax paper and having good results. I have printed images directly onto small pieces of fabric using my Epson printer by taping the fabric to freezer paper and running it through.
This was amazing! Who knew that instead of going out to buy 5 sheets of transfer paper at an expensive price, that I could use wax paper (which actually looks so much better than store bought transfer paper!). In my case, I used it for a t-shirt transfers (for templates to paint) and I used a glue stick to attach wax paper to a sheet of 81/2 by 11 printer paper. I then put it in my inkjet printer and let it do the rest. You were certainly right, I dampened my t-shirt with the water from the iron before putting the picture on and it came out very clear and very detailed!!! Thank you so much! I can enjoy transferring design templates now without having to worry about running out of paper. 🙂
Hi, Has anyone tried this on furniture like the top of a coffee table? I am trying to figure out how to seal it so that the ink is not smudged. I have tried brushing lightly with Polycrylic over the top and that smeared my ink 🙁 and I have wax, but I know rubbing wax over the top will for sure smear the ink. Any ideas? 🙂 P.S. I put the French typography over Annie Sloan Chalk Paint on a coffee table and it looks AMAZING–now to seal it :/
Tony, I haven’t ever used a sealer but I’m pretty sure others have. My suggestion would be to try a spray sealer and just do really light coats? Hope you find a solution and I would love to see the final result! 🙂
Will this work on plastic by any chance?
Does this work on shirts?
Kija, I have tried it on drop cloth and it worked, but it doesn’t wash well.
I am printing to this wax paper and transferring it to a Longaberger basket lid – it has a sheen to it and I’m wondering if it will stick – should I sand it down a bit before hand?
Michelle, I don’t know how well it work on a shiny surface? You might want to lightly sand it first.
Great technique and very easy. Also, I love the backsplash in your kitchen. Everything ties together perfectly.
Just wondering, not going to read through 300 comments (lucky you)…and it’s super, since I live in Canada, and can’t get freezer paper here anywhere…but, can you use this on fabric? And, will it be washable? Thanks!
Stacy, it all depends on the fabric. The tighter the weave, the better. It doesn’t wash the best, but if you use a hot iron before washing it helps a little.
I just did this on my chalk painted coffee table. Just taped the wax paper to a piece of card stock and worked great. Now my only question…how do I seal it? Chalk paint needs to be waxed, but I’m afraid waxing it will smear it. Any suggestions? I may use a spray shellac, only thing I can think of.
My suggestion would be to try it on a scrap piece of wood, but I think a spray shellac would work best. I would just do very light coats. Hope it works for you!!
thank you so much for this. i was prepared to try the wax paper method but chickened out after seeing so many failed attempts and so i tried the iron on tip someone else suggest. it totally worked. i printed my graphic (from graphic fairy) taped it into place on the table i wanted to do and then i dampened a dish towel and layed it over the transfer and ironed it till the towel was dry. i had my iron on the linen setting (hottest) no steam and applied a lot of pressure, trying not to move my graphic. i like it, thank you!
Going to try this tonight. I’ve been adding artwork to tee shirts for a while now, via tracing the image onto the shirt and then painting, but I think this would work perfect, being that I don’t need the original tracing to last, because I paint over it. Thank you! Fingers crossed! 🙂
Hello!
Thank you for share with us. I would like to know about wax paper. Is it a baking paper?
Thank you.
In America it is white and has a waxy surface on one side. Hope that helps! 🙂
Hello,
My name is Manuela and i from the Netherlands.
I dont know what wax paper is, can you tell me what it is?
So i can use it to. It is a great idea!!!
Greeting from Holland
Manuela
Manuela, it’s used in the kitchen and has a very slick surface. Normally it’s white. Hope that was somewhat of helpful!! 😉
I have tried several methods to try transfer on chalk painted surfaces & they didn’t work. I tried the wax paper but my printer ate it! So I tried again with freezer paper & printed on the waxy side. It worked great. Thanks for the idea! 🙂
If the wax paper won’t got through your printer make a “backing” out of a sheet of paper. Fold a lip over the leading edge and use a small piece of tape to hold it. Also as a guide you can use a piece with a test print of your design. This will help to keep the size accurate. Remember to make sure the wax paper is in loaded correctly. You don’t want to print on the paper side.
I figured this out after cutting out too many pieces of wax paper only to have them jam. I also tried parchment paper. Didn’t work.
I couldn’t wait to try it so I went out at 1:30am to get wax paper and tried it as soon as I got home. It worked great on my brother printer, I put it in the empty paper tray. You do not know how much time you have saved me! THANK YOU!!!
LOL!! So glad it worked for you Nicole!!!
would it work on a t-shirt?
I would probably work, but not sure how it would wash?
I used this method to add a letter, (monogram-type), to a glass bottle that I painted with chalk paint. Since I didn’t have your page open, and was going from memory, I just printed the letter on regular copy paper, lightly moistened the area where the letter was going, and rubbed with the edge of a paint stirrer. It worked beautifully! However, when I looked at your directions again, I saw that you had used waxed paper. So, I tested the regular copy paper on a piece of unfinished, scrap wood, moistening the wood lightly, and it worked just as well. This may be helpful for anyone who doesn’t have ready access to waxed paper.
Thanks so much!
Wow! Thank you so much. From last minute moms every where you just saved the day. It took a little patience to get an even color ink layer (due to my printer) but it transferred to a damp white t shirt beautifully.
Carrie, I’m so glad it worked for you!! 🙂
I tried the wax paper method. I too have a Brothers printer -paid a arm and a leg for it. I read on here that some folks were having issues with this printer. This is what I did –
I took one of those full size White Shipping Labels sheets (Avery 5265) peeled the backing off of it. Placed the sticky side up on the counter, took a piece of wax paper a little longer than the label, placed the extra at the edge of the counter and leaned on it – to keep it taunt, placed it right on the sticky side of the label. Trimmed the extra wax paper off the edges to conform to the label. Then I put the label in the printer and it worked like magic. Printed on the wax paper – and then placed it face down on the piece I transferred to, taped the corners so it wouldn’t shift around, rubbed with a large spoon and then lifted it up to check – MAGIC..that was so much easier than any other transfer method by far!!
will it work on black shirts?
I don’t think you would be able to see it?
can same thing be applied on fabrics like t shirt
It can, but it doesn’t wash well. You might get one or two washes out of it before it’s too light to see.
Do you think you could transfer on a canvas with this method?
Brenda, I have used it on painted metal and even a drop cloth so I don’t see why it wouldn’t work on a canvas?!? Good luck!!
I experimented with this and it DOES work!! I did find if you tape the wax paper to a sheet of printer paper it will feed thru the printer A LOT easier. Then just tear or cut the 2 sheets apart and follow the rest of the directions.
I LOVE this tutorial! I have not tried this method yet, but I found it on the Graphics Fairy. I need some clarification, Angela. I see you call it wax paper, but in a later comment, it is described as white one side and slick on one side. I thought wax paper was clear with both sides slick and freezer paper was white with one slick side. And to throw yet another kink in my question, could the wax paper you’re referring to also be known as parchment paper?
I think this an awesome idea, but I just wanted to double check before I got started. Thank you so much for your continued support of this post. I know it’s a couple of years old, but I know we all appreciate it so much!
I’m also a new follower! Thank you again, Angela!
Camille, yes in my original tutorial I used wax paper (slick on BOTH sides) so it doesn’t matter which side you use. 🙂 I haven’t tried freezer paper, but it might work just as good or better since it’s thicker. For the freezer paper you would want to use the slick side. I haven’t used parchment paper, but I’m not sure how well that would work. Hope that helps and that the transfer works well for you!!
Thanks for following!!
Angela
I’m so excited to try this. Do you think it would work on paper bags? My printer won’t take them to print directly.
Sherry, yes this should work great on paper bags!
Hi I have never seen wax paper in the UK, does anyone know where I can get it? I have seen on Amazon but not particularly cheap with postage. Really want to give it a try!
Sue, there are some other options you can use. If you have peel and stick labels, you can use the paper they come on. After you’ve used all the labels, use the slick side to print on. You can also use freezer paper. Again just use the slick side. Hope that helps!! 🙂
Hello. thanks for very useful informations. I Just want to know is it durable? I ve noticed you did it first on natural wood at 2011 and is it still has lively color?
Regards.
The color hasn’t faded but I don’t wash it regularly. I have cleaned it and it’s been fine. Hope that helps! 🙂
What if you put athin towel or something over it and ironed it on? Would that work better for fabric? And maybe lightly misting the fabric first also.
does this work on fabric?
It works on fabric but the print can’t be too small and the fabric has to be a tight weave.
Hi, this is a great idea, I just have one question:
Will it work on clothing and if so, dark clothing??
Thanks
Stephanie, it probably won’t show up real well on darker surfaces?
This is gorgeous! I am very excited to give it a try. Some friends just bought a new home and I want to give them a personalized cutting board for a house warming gift. I have a lovely bamboo board. I am just wondering how long the transfer last? If it lasts a really long time, through repeated washings I will just give my friends the cutting board. But if the transfer fades fairly quickly I want to let them know so they save it for special occasions, or just for bread. Thanks for sharing your lovely talent!
Nicole, it has lasted a long time on my board, but I don’t really use it. It’s more of a decorative piece. Also, my board didn’t have any oil or treatment, so the ink really soaked in. Hopefully that will help you!?
Thanks for stopping by!
~Angela
Cool…was thinking today….how can I transfer a picture or outline to a rock so I can paint it….will try this!
I’ve seen where several people have been successful in placing the image on chalk paint. I’m nervous to try because when you wet the chalk paint won’t it come off?? Also, many have commented that they are looking for ways to seal it after so the ink won’t smear. I’ve seen some suggestions but I haven’t seen where anyone has been successful and then posted the solution. I would love to use this method but I need to know the area can be sealed. Thank you!
Cynthia, I still haven’t tried to seal it? I can’t be positive, but I think a spray on sealer (using very light coats) would work.
I want to make sure— you print on the wax side of the paper. Have you tried printing on the wax side of Freezer paper?
Jean, yes it will work and freezer paper is a little sturdier.
I was reading through previous commentsa and saw that someone brought up the idea of canvas, which is what I wanted to try this on. Has anyone tried this on canvas yet? Can’t wait to try it out. Just wondering if anyone had any experience doing this on canvas and maybe had some tips! Thanks!
I haven’t used it on canvas but it works well on any tight weave, so I would think it would work.
Hi I have just successfully tried this method and the results are amazing. I have used it on painted wood and I’m now wanting to seal it but nervous my ink will run. Have you any suggestions as what to use, wax , varnish etc x
Gillian, sorry I am just seeing your comment!! Yes you can seal it with a spray…that works best. I updated the post with a link to my trials for sealant. 🙂
I have tried this about 12 times and was only successful twice. My wax paper keeps causing paper jams. I don’t know what I did that made it successful twice. I have an HP inkjet printer. Looks great, but I need to repeat to finish my project.
Wendy, try using a label page. After you use all the labels it has a slick side that can be used just like wax paper. It will go through your printer a lot easier! Hopefully that will help! 🙂
I was wondering if this works on shirts??? I am going to a concert soon and I would like to have a shirt with the band’s logo on it and I have tried the modpodge method and it almost ruined my shirt, gladly I was able to wash it off. I don’t want to risk ruining my shirt again
Nat, it will work but it can be temperamental! You need the fabric to taunt but you don’t want it pulled when you are transferring it, if that makes sense? It will fade some when you wash it also. Hopefully that helped?!?! 🙂
Good morning from Spain Angela!!
Many thanks for your creative ideas. I’ve been able to do everything you point out, but sadly when it comes to print on such thin paper my computer “thinks” there aren’t any paper… 🙁
Any suggestions please?
Maria, try taping it to a piece of paper? If that doesn’t work you can use an empty label page. The side that the labels are adhered to is slick, so it works the same as wax paper.
Hopefully that helps! 🙂
Hi,
I was hoping to test out this method for some DIY wedding invitations. I will be trying it on homemade paper. Have you ever tried that? If so, do you have any suggestions?
Thanks,
Amanda
Amanda, I haven’t use it on that type of medium. If the paper is not flat, it might not work well? 🙁
Thank you so much…it is a different technique for me 🙂
I’m trying to do something similar to this, except I’m trying to transfer an image onto a white pillar candle. I’ve seen another tutorial that says to print out an image on tracing paper, let it dry, cut out the image and use another piece of tracing paper to hold the image against the candle and then use a hair dryer to melt the image onto the candle. The tutorial looked great but I’m a little skeptic. Any idea if the method you used would work on a candle?
Molly, I have used this method on a candle before but it’s very tricky. You can’t let the image move AT ALL or it will smear and you are working on a rounded surface which is more difficult.
I’m having trouble with getting the printer to not eat the wax paper…….anyone else have that problem or is it just me? 🙁
Amy, you can use the label sheets or some people have had success with freezer paper. You just want to make sure and use the waxy side of both.
Thank you so much for teaching me this cool little trick. Not something I thought of but for sure going to try out now. Keep up all your hard working putting this together to let us know, greatly appreciated and love seeing what other ppl do
Can you use the cutting board after transferring image to board? if you do not seal it will the image run off when wet?
I made mine specifically for a decorative purpose, but if you only put a design on one side and used the other for chopping it would probably be fine. My image did not come off with water but if your wood has any kind of treatment it might. I would do a spot test first, just to make sure. 🙂
Hi,
I was wondering if this would work if my wood has been painted. If it would work, should I still wet it a little before I put the wax paper down? Thanks!
Shelby, it works on most painted surfaces but I would test it on a scrap piece first. (It will depend on the type of paint you use as to how well it will stick and how dark it will be.) The wet method only works on non sealed wood.
Angela,
You have to love Pinterest because, that is where I just found you. Wow! i like the way you think outside the box. I am always looking for ways to change up my house or decor.
Necessity or not saving money on anything is always a good idea. I am sharing your FB page today on mine.
Thanks for refreshing my creativity,
Karen Marie
Dragonfly & Lily Pads
Thanks, Karen!! I’ll head over and check out your page too! 🙂
Can I stain over the ink after it dries for a while or will it still run?
Amanda, you should be able to stain over it if you used raw, untreated wood. Test it first! 🙂
We have a Brother and we used the label paper and it WORKED perfectly….oh we dampened the surface as well 🙂
Thank YOU!!!!!!!
forgot to say that there were no smudges either….you don’t know how happy this has made me!!!!! We are sanding down TV tray tables and staining in a red oak on the top/table part surface and painting the legs white. Varnish last.
Hi! Thanks for posting this tutorial 🙂 I am going to experiment a little with this method before I try my project. Since so many have had issues with their printers and the wax paper, I’ll try the suggestions of a few others, shared in the comments. Don’t want to wreck my printer! Will report back with results 🙂 One question I have is this…in the beginning of the post, you mention having “to work quickly”. Are you referring to a need to get the paper down and start scraping immediately after printing? – if yes, is that because you need to work while the ink is wet? Thanks!
Colleen,
Yes, it transfers easier when the ink is still wet. However if you dampen the wood slightly (you don’t want it too wet) it will work even if the ink is starting to dry.
Hi! Great tutorial! I wondered if you had any suggestions about how to trick your Epson printer into printing on the waxed paper? I tried both wax paper and the waxy part of sticker paper but each time when I tried to print, the “paper” was fed through (and it sounded like it was printing) but nothing was on the page when it finished. Not sure if there’s something I should be doing differently?
Thank you!
Jessica
Many questions about where to purchase wax paper in the uk.
I can buy Cut Rite exactly as per your illustration in Hobbycrafts and it is also sold in “Inspirations” craft store in my area. I cannot find it in kitchenware retailers or any supermarkets. Some try hard to sell me greaseproof paper which is nothing like wax paper.
I have never seen “Freezer paper” in the uk.
Hope this helps.
Thank you for an interesting project, I am using transparencies as I would rather pay for a packet of those than risk having to replace my printer! 🙂
Eric
Thanks for sharing that Eric!! I know I get that question a lot! 🙂
I just want to say that I have a Brother inkjet and what I did was cut the wax paper to fit regular paper and I carefully taped around the edges of the wax paper to the regular paper and sent it through the printer. IT WORKED FANTASTICALLY. Gave it enough strength to go through the machine. Just make sure you have the correct side facing the right way!!
The only down fall is you cannot see the placement of the transfer, so it has to be right the first time, and you have to be even more careful of smudges!! I practiced on paper first before doing final transfer. And I found that if I wiped the wax paper with a damp cloth after I was done I could reuse the same piece of wax paper.
Very awesome (and cheap) transfer technique. Thank you Angela!
I just tried this! My machine would not take the wax paper so I used a spray adhesive to attach to the wax paper and it worked! I found a free surfing related image (small) and transferred it to my jeans. It came out kind of faded, like an old stamp affect.
Cute and so much less expensive then buying transfer sheets plus I also love that I don’t have to use a laser printer.
THANKS!
Renee,
I’m so glad it worked!! 🙂
is this safe to eat off and wash or is it just to look pretty? I’m looking to make a custom cutting board for a wedding gift and I want it to be functional.
Danielle,
When I made mine it didn’t wash off but I never used it as a cutting board. If your cutting board has two useable sides I would just use one side for cutting. Also, you might need to lightly sand the side you are adding the transfer to if there is a finish on it.
There is also this finish you can buy that is called ‘butcher block stain’ which makes wood food safe. that is what I am using over these. I also, because the monogram letters didn’t come through quite as dark as I had hoped, used a paint brush and an ink pad to darken them a little and they look GREAT! This idea is so awesome, thanks for sharing!
I am so happy to have discovered your blog! Just subscribed and excited to seeing more:) Thank you!
Thanks, Heather!! 🙂
Hi there! This method is awesome and I’m dying to try it! Problem is, don’t own a printer (last one died long ago). Somewhere I read you could transfer a normal paper print first to the wax paper and then to wood, however I can’t find how to do that. Do you have any idea on how to achieve that? I can only think of:
a) Acetone transfer from paper to wax,
b) Iron the print over the wax.
I’m actually scared of setting my house on fire, jaja.
Great blog!
Marian, I’m not sure about transferring it from a print to wax. I have heard of people transferring a print using Mod Podge. This link has a bunch of different tutorials: http://modpodgerocksblog.com/tag/mod-podge-photo-transfer
I tried this and unfortunately, it didn’t work out so great for me. Firstly, I discovered not using a credit card and just pressing firmly worked. Second and foremost, it ruined my printer. My paper got jammed on the second try and now my printer is way off alignment. It may need to be thrown out. I would highly suggest just buying the transfer papers. Yes, they are pricey, but not as expensive as a new printer. Just my two cents.
Thank you SO very much for this tutorial! It worked quite well the first time but then my printer refused to accept the wax paper and it got jammed so many times that I lost count. I nearly lost hope but while reading the comments I stumbled upon a wonderful tip by one of the commenters!
I used acetate sheets (I dont know if they are actually acetate sheets because they are a little thinner but definitely sturdier than normal A4 printer paper) and printed onto it and it worked so well! I used it on a whitewashed piece of balsa-wood. The best part about the acetate is that I can simply wipe away the print once I’m done and reuse it!
Thank you so very much! I’m going crazy with the possibilities that this project can bring! c:
Hola, Creo este es un gran blogs. Yo stumbledupon ella;) Yo revisitar una vez más ya que tengo marcada guardado como favorito
ella. El dinero y la libertad es la mejor es
la mayor forma de cambiar, puede usted ser rico y seguir guía Otros.
Question. After printing your image does t need to be transferred right away? I m asking because I dont have a printer at home and was planning on printing it elsewhere and taking it home, now I m not sure if that is possible?
Cori,
It doesn’t need to be transferred immediately but I don’t know how long until it dries. Sorry, I’m just not sure.
I found this method to be easier for transferring type as opposed to the modge podge method. I also found it helpful to tape the wax paper into place. cheers!
This is hte first time trying this method and it is SO easy. I’m going to have to control myself, as I want to try it on everything. Thank you for the wonderful tutorial.
GREAT! I’m so glad it worked for you! 🙂
I’m looking to transfer an image on the front of an antique armores’ doors. My available space is 18′ tall x 24″ wide. How do you recommend I print this image to transfer using the wax paper method?
Thank you!
Do you use the same technique on glass
I haven’t been able to get this technique to work well on glass. If you used a chalk paint over the glass first, this method would work, though.
Can this technique be used to make shirts as well
I did that and it didnt work
Will it work on glass ( like the glass thats in a picture frame )
It probably won’t stay. 🙁 It works best on porous surfaces.
I just used this for a wedding sign! I will definitely be using it for all of my upcoming wedding signage haha. Only thing is, it isn’t showing up on the wood as dark as I hoped. Any suggestions besides going over it with a sharpie? I do not have a steady hand and since I am left handed I would cause smudging lol
The only thing I can suggest is to transfer onto raw wood that is slightly damp. That always seems to show up the best for me. Good luck! 🙂
Thanks! I figured out a way that actually works great! In word on my MacBook I can select print and then go to the print setting and choose t shirt transfer, it ended up printing it at a much higher quality (more ink) which showed up a lot more and I didn’t have to flip every image! I also just was wondering if you can do this in white on darker surfaces? Or if I painted wood with white paint would it still soak into the wood after the paint is on it? Thanks for all your help!
That is GREAT to know!! Yes it should still work on a painted surface, as long as the paint isn’t too glossy.
Will this work for fabric?
Very Nice Post
Nice Post
When you’re putting the paper into the printer, do you put it wax side up or down.
It depends on your printer, but my printer prints on the side facing up.
Wow, thank you so much for going in details because I was somewhat frustrated with my transfer that turned out fainted just like your “without water” image. After wetting my wood board a little, it worked like charm! Cheerios!
I had tried this a couple of times previously.. But the transfer ended up to be very light.. Hope your trick of making the wood wet work.. Thanks for sharing!!
This is a great post by you, I liked your post, keeps it up writing a blog.
Can you use this method on plastic? I am trying to customize plastic Christmas bulbs. Thanks.
I am thinking of trying the on a project I am making. I am making a cribage board out of a piece that was cut off a walnut tree. It is 28 inches round 3inch thick piece of wood. Since walnut is a dark wood if I do my transfer in white will it work? Also would you finish the wood first? I will just use polyurethane to seal it. Would the transfer work on that and then spray it with a clear coat and then poly it again. Thoughts?
Awesome post and idea
For those people that don’t have Paint, or other graphics software, you can download Irfanview for free and it does flip both horizontal and vertical.
It has been good to learn this article it absolutely was quiet to be good you every aspect concerning the topic Thanks for sharing this informative article with us. If you prefer more info then visit here –
Could you use a regular printer for this and can you put it on fabric without it washing off?
I wanted to get a shirt done but I really need this image transferred. I can’t find any method that is really cheap and really simple. help?
Like someone else who left a comment, I too just can’t get the print to take using freezer paper – ink just forms in small blobs/bubbles. I’m using a new Canon inkjet printer. The result looks much like trying to paint with water colours on an oily surface, the ink doesn’t want to adhere to itself, just bubbles/blobs in the vague form of the image. 99% of people don’t have any issue, so I’m not sure what is going on.
YES! I finally found this web page! I’ve been looking just for this article for so long!!
cool Ideas
magnificent put up, very informative. I ponder why the opposite specialists of this sector do not understand this.
You must proceed your writing. I am confident, you’ve a huge readers’ base already!
Right away I am ready to do my breakfast, afterward having my breakfast coming again to read other news.
It’s remarkable in support of me to have a web
page, which is useful designed for my knowledge.
thanks admin
Thanks – having these instructions all in one place is wonderful!
Hmm it appears like your site ate my first comment (it
was super long) so I guess I’ll just sum
it up what I had written and say, I’m thoroughly enjoying your blog.
I too am an aspiring blog writer but I’m still new to the whole thing.
Do you have any tips and hints for beginner blog writers?
I’d really appreciate it.
Thank you for the good writeup. It in truth used to be a enjoyment account
it. Look complicated to far added agreeable from you!
However, how could we keep in touch?
Hi all, here every person is sharing such knowledge, thus it’s
pleasant to read this weblog, and I used to
pay a visit this weblog everyday.
Love this post, but call me stupid, but how did you get the reverse image for printing? I took a quick look at The Graphics Fairy and the images look right-sided.
Hi there colleagues, pleasant piece of writing and pleasant arguments commented here, I am truly enjoying
by these.
The Liquor Outlet is located south of Wigwam
and north of Blue Diamond Road on the west side of Rainbow Blvd.
(+) Great selection! I love to come here to get beers of places
I’ve been to on my travels. They have Singha and Chang (Thailand),
Peroni (Italy), Beer Lao (Laos), Kirin Ichiban and Asahi (Japan), Guinness and Harp
(Ireland), Kronenbourg 1664 (France), Pacifico, Tecate,
Corona, Sol, Modelo, Dos Equis (Mexico).
They even have the Metallica beer (Enter Night) and
some of my old favorites like Stella, Blue Moon, and Heineken.
(+) Easy to access location on Rainbow Blvd. Never had a problem pulling in, getting what I need, and getting out.
(+) Service has been A-ok. One guy was really cool and personable (older guy) and another
guy was kind of just….there. lol Not terrible or rude, but was kind of running
on \ https://bjx.com.cn
I’m now not positive the place you’re getting your info,
however good topic. I must spend some time finding out more or working out more.
Thank you for fantastic info I used to be searching for this info for my mission.
Great blog you’ve got here.. It’s difficult to find quality
writing like yours nowadays. I honestly appreciate individuals like
you! Take care!!
It’s truly very complex in this active life to listen news on TV, so I only use web for that
purpose, and get the most up-to-date information.
Thank you for posting this. I just tried wax paper and my printer eat the wax paper! I will try this this week end! Cute ideas keep up the classy work!
Hello, I was wanting to know have you ever tried this on frosted glass I want to try this out my pantry door. I would be putting it on the in side so would I be reversing the letters? Also dose it matter what side of the wax paper?
You need to print onto the shiny side. That way, the ink will stay wet which will mean it will transfer onto the wood.
I got this website from my buddy who informed me concerning
this site and at the moment this time I am
browsing this website and reading very informative content at this place.
Love all your transfer tutorials! Pinned another! I love the French look of the font on this one, especially, but I think your fish camp sign is my all time fav!!
Hello all, here every person is sharing such experience, therefore it’s
nice to read this webpage, and I used to pay a visit this webpage every day.
The Hoppa Bus got me from and to the airport for 8.
Where millions of other people are putting in money in hopes of winning the big one.
The hour-long tube ride back to my hotel went rather quick.
Excellent post. Keep posting such kind of info on your
page. Im really impressed by it.
Hey there, You’ve performed a fantastic job. I will certainly digg it and in my opinion suggest
to my friends. I’m confident they will be benefited from this website.
I was suggested this website via my cousin. I am not sure whether or not this put
up is written by means of him as nobody else recognize such unique about my difficulty.
You’re wonderful! Thanks!
It look great! Thanks for sharing that.
thanls
Can you tell us more about this? I’d care to find out some additional information.
This wax paper transfer tutorial is great for saving some money
Hi, I think your site might be having browser compatibility issues.
When I look at your blog in Chrome, it looks fine but when opening in Internet Explorer, it has
some overlapping. I just wanted to give you a
quick heads up! Other then that, terrific blog!
Hi there
would this method work on a plastic object like a christmas bauble?
thank you
The object can’t be too slick or shiny. It’s need something to hold onto. If the plastic is slick you might want to paint it first.
You are really amazing and very creative. This is the easiest way of wax paper transfer. Thank you for sharing it.
cool nice one
cool nice one
came across this awesome tutorial on Pinterest on how to transfer images using wax paper and was pumped to try it with this project. If you are looking for a way to accomplish the task
Cool post you gat here
Really lovely
Amazing Content!
Custom Packaging Boxes carries a large variety of printed cardboard boxes, small boxes packaging includes, but is not limited to RSC cartons, Small mailing boxes, Small packing boxes, coloured and kraft jewellery boxes, Small favour boxes, metal containers and more.
You will need to reverse the image. Most computers have the program Paint. If you aren’t sure just do a search for it in your start bar. Open the picture you want to flip, then go to Image in the top bar. There is a drop-down option for Flip/Rotate. That should reverse the image for you.
Put the wax paper in the printer and make sure it’s under the rollers, but not too far in. If you put it on top of printer paper, you can use the paper as a guide on how far the wax paper needs to be in the printer.
I have been playing around with a lot of mediums lately, one being iron on transfers. I had bought some the other day, but they are pretty expensive if you only make one item per sheet. So I thought I would try an alternative. The only thing I had around was wax paper, so I gave it a try and it worked GREAT! See how I transfer images using wax paper:
[…] I used 2 vintage ad graphics from The Graphics Fairy to make the glass inserts unique. I used this transfer method from Unexpected Elegance. But, I used spray adhesive to put my wax paper on a piece […]
Packaging Boxes carries a large variety of printed cardboard boxes, small boxes packaging includes, but is not limited to RSC cartons, Small mailing boxes, Small packing boxes, coloured and kraft jewellery boxes, Small favour boxes, metal containers and more.
Hello
I used 2 vintage ad graphics from The Graphics Fairy to make the glass inserts unique. I used this transfer method from Unexpected Elegance. But, I used spray adhesive to put my wax paper on a piece
Hello
Packaging Boxes carries a large variety of printed cardboard boxes, small boxes packaging includes, but is not limited to RSC cartons, Small mailing boxes, Small packing boxes, coloured and kraft jewellery boxes, Small favour boxes, metal containers and more.
Great and great post. Thanks for this
Hello
Can you do this on painted wood? If so what kind of paint would you use on the wood? I am needing step by step direction as to how to do this. I see a lot of transfer directly to wood but need help to do it on a painted wood surface.
Hello
I’ve printed onto white (or light) tissue paper (Tracing Paper also works) and then I mod podged it. Since the tissue paper//tracing paper is so thin the mod podge kind of seeps in and it does a wonderful job at blending it in with the canvas which can give it a painted effect.
Hello
Can you do this on painted wood? If so what kind of paint would you use on the wood? I am needing step by step direction as to how to do this. I see a lot of transfer directly to wood but need help to do it on a painted wood surface.
This is such a great idea
Was curious if this works after the ink has dried several hours on the wax paper?? Like if I would use it for a ladies craft and print all the wax paper sayings ahead of time. Thanks
Love the write up
Wow!!!
It is important for our students to be able to quickly identify sight words and then to be able to spell them. This activity makes a fun literacy center, fast finisher activity witneycouriers
These look cool. Thanks for sharing. I’m visiting from the Over the Moon link up today. Have a great week Stacy!witneycouriers
Very good customer service. I called and asked questions four times before I decided what type box to order. They answered my call every time without being forced to go through a recording. I received my order custom packaging boxes uk promptly, and everything is fine.
Can the wood be stained with a water base stain before transferring a printed document to it?
With all good recommendations i must say that this site in all platform and post remains outstanding to the contents found in other site similar to this one
With thoughtful design, you can promote brand awareness, better protect your products, save money, and improve consumers’ attitudes towards your brand. Creating the best possible custom shipping boxes will elevate your product in many ways.
Wow. These look cool. Thanks for sharing. Through this tutorial, I learned how to transfer images using wax paper.
This method works. I also tried it some days before. Thanks.
Nice
This is really great,unique and very informitive post, I like it.
Would this work on T-shirts?
Thanks for the transfer tutorial. I have yet to try this, but it’s on my list!
I am your newest follower and plan on linking to the Transfer Link Party this week.
Thank you for sharing.
Mandy
https://stormmp3.com
Hi, just found your blog. Loved your instructions! I have been wanting to try this. I actually liked both looks, the paler one looks very vintage. I am now a new follower.
https://naijapopup.com
Very well explain. I really appreciate your effort.
Well understod i really love your content
Awesome tutorial
Nice post, I really enjoyed reading this article, it explains everything in a simple way. Free Mockup
bd sex video freelancing course
Thank you for this great contribution, I find it very interesting and well thought out and put together. I hope to read your work in the future.
Your work is so good I like Your articles writing your writing is so clear I liked it you are a great writer. I appreciate your work.
good look
Amazing that you share this informative blog, It was really a great information. I am very thankful to you. 200+ Best Free iMac Mockups for 2022
Wax paper is the greatest invention. this kind of paper is nowadays used in many and too many industries for many more purposes. Food-related products are also packaged in them. but it is not enough to save your products from the light and water. If you used custom packaging boxes with it. your products will be more secure from damage in many ways. your custom boxes for your products.
I like your blog, want nore content
I love this and I have a beautiful old chandelier in the garage I can use. Thanks for sharing.cape verde holiday
Darling idea! The squirrels around here would eat all the food before any birds could fly in. We have a real problem. I took my feeders down. Even the ones that were supposed to be squirrel proof didn’t deter those pesky critters. cape verde holiday
I Have learnt so much from your article, Thanks for sharing it.
You are great. Acknowledges for paper such a beneficial composition, I stumbled beside your blog besides decipher a limited announce. I want your technique of inscription. แบบการ์ดแต่งงาน
Fantastic post! Please keep sharing. I know of a roofing company if you are looking for Game Please get in touch! Thanks, have a good day. แบบการ์ดแต่งงาน
The article you have shared here is very awesome. I really like and appreciate your work. I like this and its helpful for me.
Download Latest Hip Hop Music & Foreign Songs 2021, 2022
Transfer Designs Using Wax Paper and an Ink Jet: If you have an inkjet printer, you can easily transfer text and pictures to a piece of wood, using some …
Thanks for posting your valuable thoughts with us & our readers. Please keep coming & continue commenting on this blog
Satta Kings is one such platform wherever individuals create bets on-line to win money, because it may be one every of the simplest and quickest ways to earn superfast money. Satta king fast is of the many varieties, and not only one. during this fashion, you’ll place multiple card-playing positions at a time and have subsequent chance/hope to win, though it’ll continuously come to you.
One of the simplest choices is Black Satta. Here you’ll be able to notice every kind of Satta results. With the new consequence to the Black Satta King, the winning hints also will be mentioned on its web content.
Satta king online website is one of the leading websites in the Satta king market. we tend to update all the Satta king game results super quickly which is the reason for the quick growth in our guests. we actually give thanks to all our guests to create the highest then website of Satta king.
Well down
I like your writing style. It’s inspiring and I am truly grateful for the writing style. Visit my site. We provide the players with all kinds of Black satta and show the Satta result. You don’t need to go around in search of an authentic website to play as we deliver original and genuine satta king online games for everyone. So, be relaxed when playing on and enjoy every bit of the game. We provide the best experience to all players and let them have fun while betting.
I have been exploring for a little for any high quality articles or blog posts in this kind of area satta matka
This tutorial on transferring images using wax paper is a great DIY project for those looking to add a personal touch to their crafts. The instructions are clear and easy to follow, making them accessible for beginners. It’s a fun way to customize your items and add some creativity to your projects.
Learn More About: Soap Packaging Ideas
Your writing style is appealing. It’s motivating, and I sincerely appreciate the writing style.
i and additionally my friends ended up following the fine thoughts from the blog and so speedy i were given a horrible feeling i by no means expressed 토토궁검증업체
incredible records sharing .. I’m very satisfied to read this newsletter .. Thank you for giving us go through information. Extremely good fine. 주간토토 먹튀검증사이트
Nice tutorial really enjoyed this
For latest nollywood movies
Probiere deutsche Tiktok likes kaufen jetzt und beobachte, wie deine Vorlieben in die Höhe schnellen.
https://tiktoklikeskaufen.de/
Custom Boxes World is providing Vape Cartridge Boxes as per your needs.We can help you create the perfect Vape cartridge boxes to represent your brand.Custom Boxes World have a wide variety of vape packaging. Cartridge vape packaging gives you good flavor,smooth smoke and taste.We also provided dropshipping and fastest turnaround time all over the UK.
I have been playing around with a lot of mediums lately, one being iron on transfers. I had bought some the other day, but they are pretty expensive if you only make one item per sheet. So I thought I would try an alternative.Crocs
i did click on the site for the free course and keep getting a message : critical error on page. So that page is not avalible. I have used this method on other types of art work and so now I am ready to try this one and excited to see it! I use charcole on tissue paper to transfer the head stone on my Grandmother’s grave. I was honored to be able to do this. Mother died when I was a baby, Grandmother raised me until I was 14. I did not get to go to her funeral. The wax paper method will be great for keepsakes.
This tutorial on transferring images using wax paper is just what I needed! The step-by-step guide was clear and easy to follow, and now I can create beautiful image transfers with confidence. Thank you for sharing this helpful technique!
Nice content you gat here today
This is a very informative
Excellent customer service! I contacted them several times before finalizing my custom printed packaging boxes UK order, and they were always quick to assist without any automated recordings. My order arrived on time, and everything was perfect!
this is a well detailed tutorial, I’m glad to have such information.
nice work thanks for sharing
Good work keep it up….
Good work on all the information keep it up ….
nice work thanks for sharing
This wax paper transfer technique is fantastic! I can already see myself using it for unique and personalized corporate gifts like customized wooden boards or fabric items. It’s such a cost-effective way to add a thoughtful touch without breaking the bank. Thanks for sharing this tutorial!
I love this tutorial
This is so interesting
Get real-time roof cost estimates with our smart roofing estimator. Compare materials, plan your upgrade, and increase home value—no phone calls needed.
At Ice cream cone sleeves, Ice cream cone sleeves are customizable, eco-friendly holders designed to enhance customer experience and provide a mess-free way to enjoy ice cream while boosting your brand visibility.
This wax paper transfer idea is so smart! I love finding ways to save money on craft supplies. It makes me wonder if you could use something like a chat gpt image generator to create unique designs before printing them for transfer. Thanks for sharing this helpful tutorial!
Download latest movies and stream live matches
Supermaker GOOD article,It is so useful for me
Get expert help from an AI advisor, AI financial advisor, advisor AI, AI consultant & AI business consultant to grow your business with automation.
Since I followed your blog, I learned many new ways to play bet on Satta king result and no doubt the best way to bet money without any financial risk, I applied it and grab several advantages. Highly Recommended, follow the blog and increase your experience.
Whoa, this wax paper transfer trick is genius! Gotta try this DIY project soon. So much cheaper than buying transfer paper. Thanks for sharing!
Wonderful & very informative article. Thanks for sharing such a informative and useful post. Good you explained everything in detail it has been a great help. https://www.vivaindia.com/
I found this post very easy to follow, it clarified some points I wasn’t fully sure about. Recently I’ve also been trying out this tool and it’s been quite helpful: Lipsync AI.
This article really helped me understand the basics, appreciate it a lot! By the way, I found this tool very useful: Flux.2 AI.
The way everything is laid out here makes it so much easier to understand. I’ve been exploring different resources and found this tool especially practical: ImagetoVideo.
This helped clarify a few things for me, thanks for posting. If you ever need to extract the prompt and scene details from any video: https://videotoprompt.net/
Pin from scribble
AI Image Editor, Great article — it’s really helpful for me!
Post free classified ads in Pakistan with quick and easy tools. A smooth way to buy and sell online with simple posting and fast results.
Ideal for storytellers and brands, https://pixclever.com/ simplifies creative workflows.
This wax paper trick is so clever for saving money on transfers! It reminds me of fun DIY projects like personality quizzes, such as which pony I actually am, which add a playful twist to crafting.
This wax paper tutorial is so creative and budget-friendly! It reminds me of how fun DIY projects can be, like taking the Ginny & Georgia character quiz to discover my personality match from the show.
This wax paper transfer tutorial is so practical! Simple steps that are easy to follow, perfect for beginners. You can create delicate pattern transfers just with wax paper, it’s totally perfect for DIY crafts and I’m definitely going to try it~
Great article! For more on Adiza Sankofa’s life and rise as a model and influencer, check out adiza sankofa biography.
Thanks for sharing this. Prompt writing is way less intimidating when you can learn from proven examples. I’ve been finding a lot of inspiration lately on Banana Prompts.
This wax paper transfer tutorial is so creative and budget-friendly! It reminds me of how technology can also simplify creative projects, like using Seedance 2.0 AI to turn images into videos easily. Thanks for sharing!
Nice read! I also found a good overview about adiza sankofa bio that adds more context.
Great read, really enjoyed this. Bookmarking for later. If you’re into fun online content, check out http://www.bizarrelineagecodes.com too.
I found your post on “Unexpected Elegance” really insightful, especially your creative use of wax paper for iron-on transfers as an alternative to expensive sheets. It’s brilliant how you adapted materials you had on hand! Your tip about wetting the wood slightly for a darker transfer is also a great detail, and I’m keen to try it. I’ll definitely be checking out The Graphics Fairy for some design inspiration. If you’re looking for more creative ideas, you might find some interesting projects at https://nanabananapro.com/.
It’s great to hear about your successful wax paper transfer method as an alternative to expensive iron-on transfers! The tip about wetting the wood slightly for a darker transfer is particularly helpful. For those interested in trying this technique, you can find the video tutorial mentioned in the article at https://seedance2video.net/.
Reading your article is the most focused ten minutes of my day. I would suggest reviewing Veoo AI for best practices.
Distance can test a relationship, but with commitment and effort, it can also strengthen it. Our guide on long distance relationships offers practical advice on staying connected, planning visits, and supporting each other from afar.
Thank you for sharing such useful methods. It really helped me a lot. NanoBanana2 delves into the technical aspects of this.
Download latest movies and stream live matches
Such a creative tutorial. It’s always fun seeing simple materials like wax paper turn into something that looks really unique and handmade.
Zeezscreen was here
I never thought of using wax paper for image transfers! The idea of saving money on transfer paper is definitely appealing, especially since I only make a few items at a time. I’m excited to try this out on my next project.
gemini omni
This is such a clever idea! I never would have thought to use wax paper for image transfers. I’m definitely going to try this out to save some money on transfer paper.
gemini omni flash
Omoggle 1v1 Mog Battle Game.
If you love creating AI art, check out loraai.me. LoRA AI delivers professional-grade images with excellent prompt understanding and style consistency. Supports custom LoRA training, batch generation, and quick editing. No coding needed — just describe your vision and get amazing results fast. A real game-changer!
Shared with my colleagues, everyone said it’s great.Don’t know color theory? nanobanana2
can help.
This is a thoughtful take on unexpected elegance. The practical examples really help illustrate the concepts.
shuu3833
The discussion about unexpected elegance raises some really valid points. This perspective is refreshing.
see334
Discovered Sora 2 on aisora2.com today — it’s incredibly powerful. Create photorealistic or cinematic videos with perfect physics simulation and built-in audio. No editing skills required. The results look professional and ready to use. Highly recommend for marketers and content creators! For an in-depth exploration, see text to video AI.
The discussion about unexpected elegance raises some really valid points. This perspective is refreshing.
grokaivideo
This is a thoughtful take on unexpected elegance. The practical examples really help illustrate the concepts.
happyhorse 2.0
Thanks for sharing! This post is really helpful. also can enjoy the game at accelerationcity.cc
Compare model behavior, control credit spend, and move from rough idea to review-ready motion without a heavy editing stack.
The detail about wetting the wood slightly to make the transfer darker is a very useful tip! I’ve found that sometimes just pre-treating surfaces helps things adhere better when doing crafting projects, much like adjusting tension for proper results when using materials such as those needed for traffic rider installations. Does anyone have experience testing this on really porous materials, like unglazed terracotta?
This is a thoughtful take on unexpected elegance. The practical examples really help illustrate the concepts. If you want a related example, SongUnique is worth a look.
The trial-and-error notes are helpful because they explain not only the wax paper method, but also why it can replace expensive transfer sheets for one-off projects. I bookmarked https://gag2tools.com/ while comparing simple reference pages that keep practical steps easy to find.
Peanutize Me – Create Your Own Peanuts Character! Free Avatar MakerTransform yourself into a beloved Peanuts character! Create custom avatars in Charles M. Schulz’s iconic style with our free Peanuts character creator. Join Charlie Brown, Snoopy, Lucy, and the gang! Free Platform maintains an up-to-date resource library.
The credit card trick is a game-changer for smoothing out the transfer. Nano Banana Pro helps me design craft project guides.
If you love creating AI art, check out loraai.me. LoRA AI delivers professional-grade images with excellent prompt understanding and style consistency. Supports custom LoRA training, batch generation, and quick editing. No coding needed — just describe your vision and get amazing results fast. A real game-changer! Expert opinions are compiled at Product Launches.
https://ezier.ai/Ezier AI is a powerful AI solution that helps users create, customize, and optimize digital media content using modern artificial intelligence tools.