It’s been a few weeks since I’ve updated you with my One Room Challenge, bathroom makeover. I’ve had some hiccups…
First off, I’ve had a heck of a time picking the right paint color! I really wanted to add a bold color to the walls, but I couldn’t find the right shade. Nothing was working once I got it on the walls.
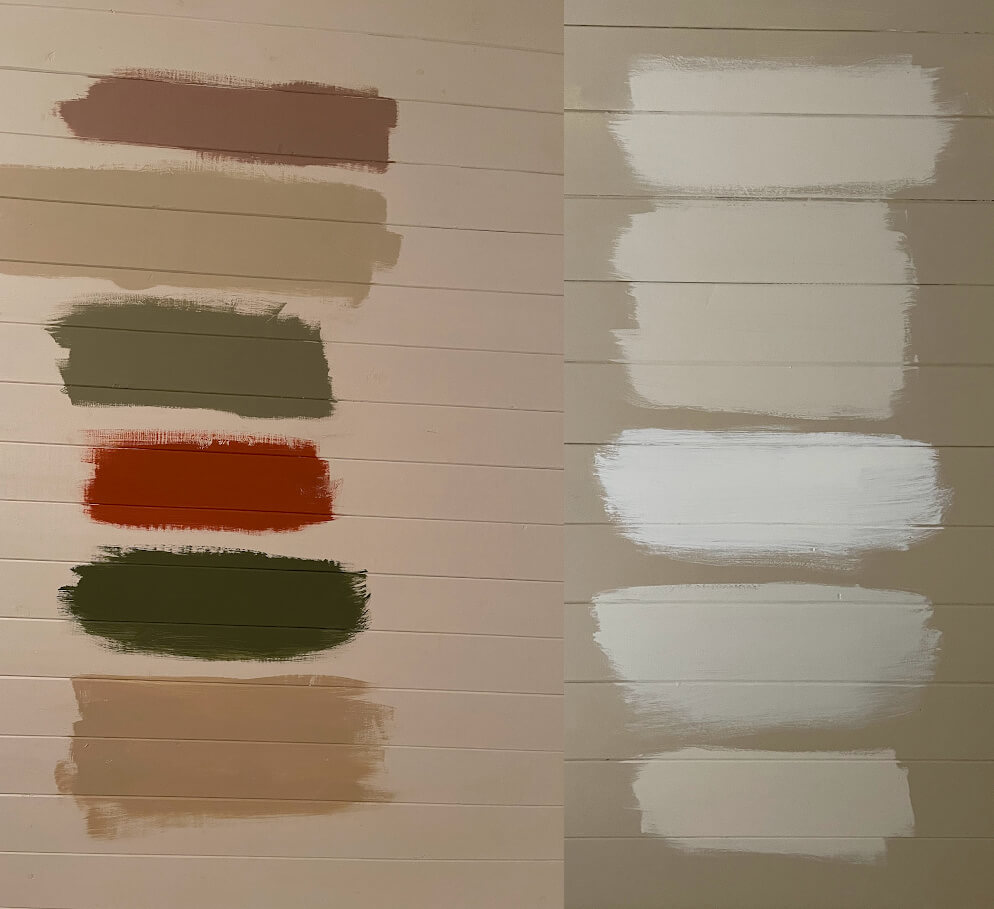
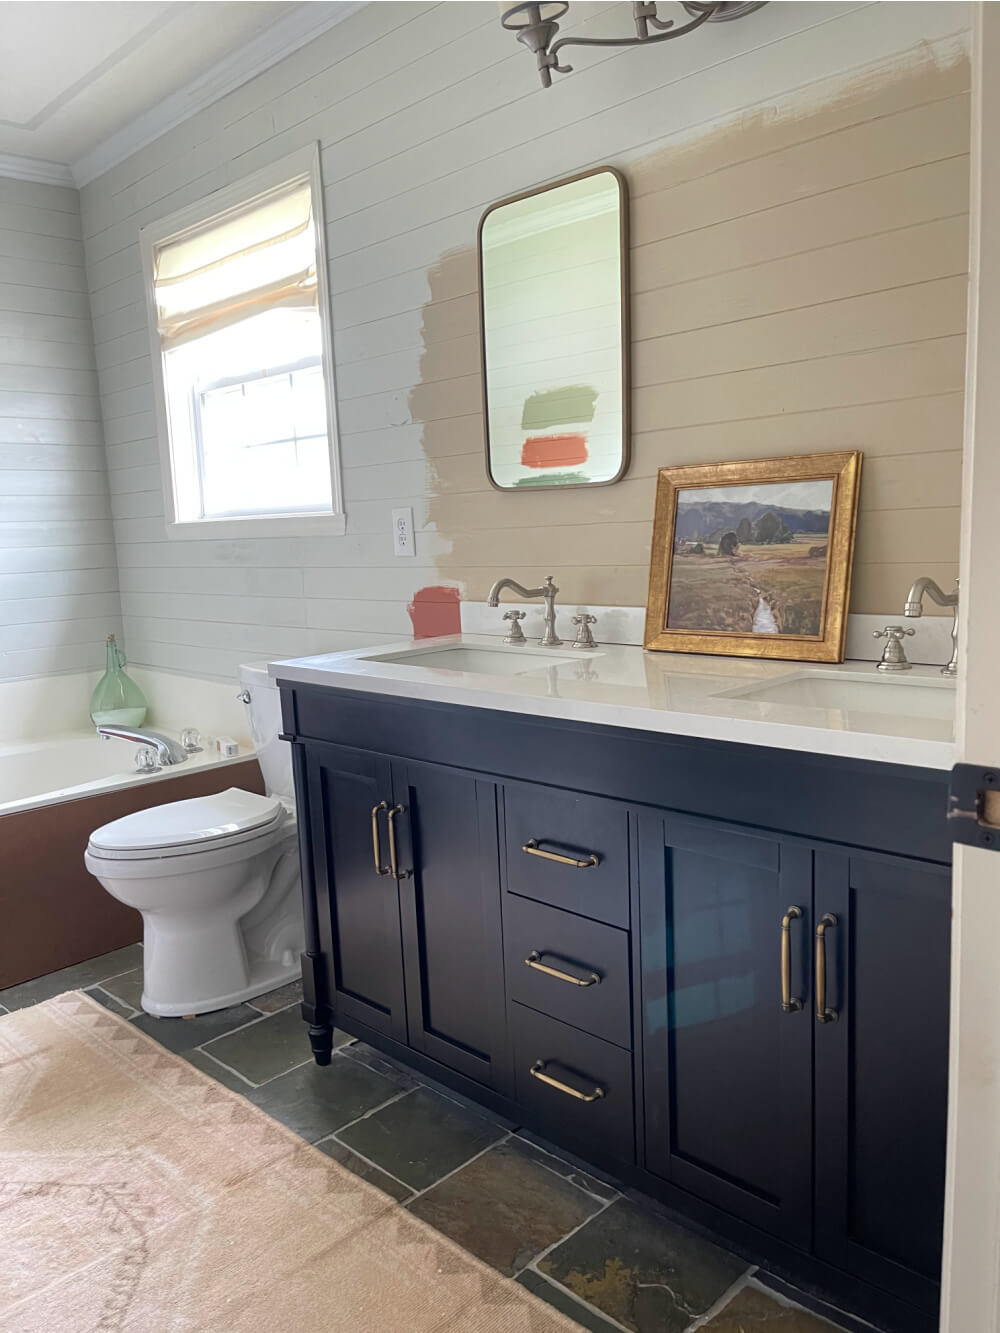
As you can see there was a lot of testing!! I even painted the entire bathroom in the bottom color on the left…only to realize I didn’t like it AT.ALL.
Here you can see the brown/taupe next to the original color. ↓
I ended up mixing two of the sample paints together to get the final color. It’s a super light beige. It looks like a soft white in the photos but is a little darker in person.
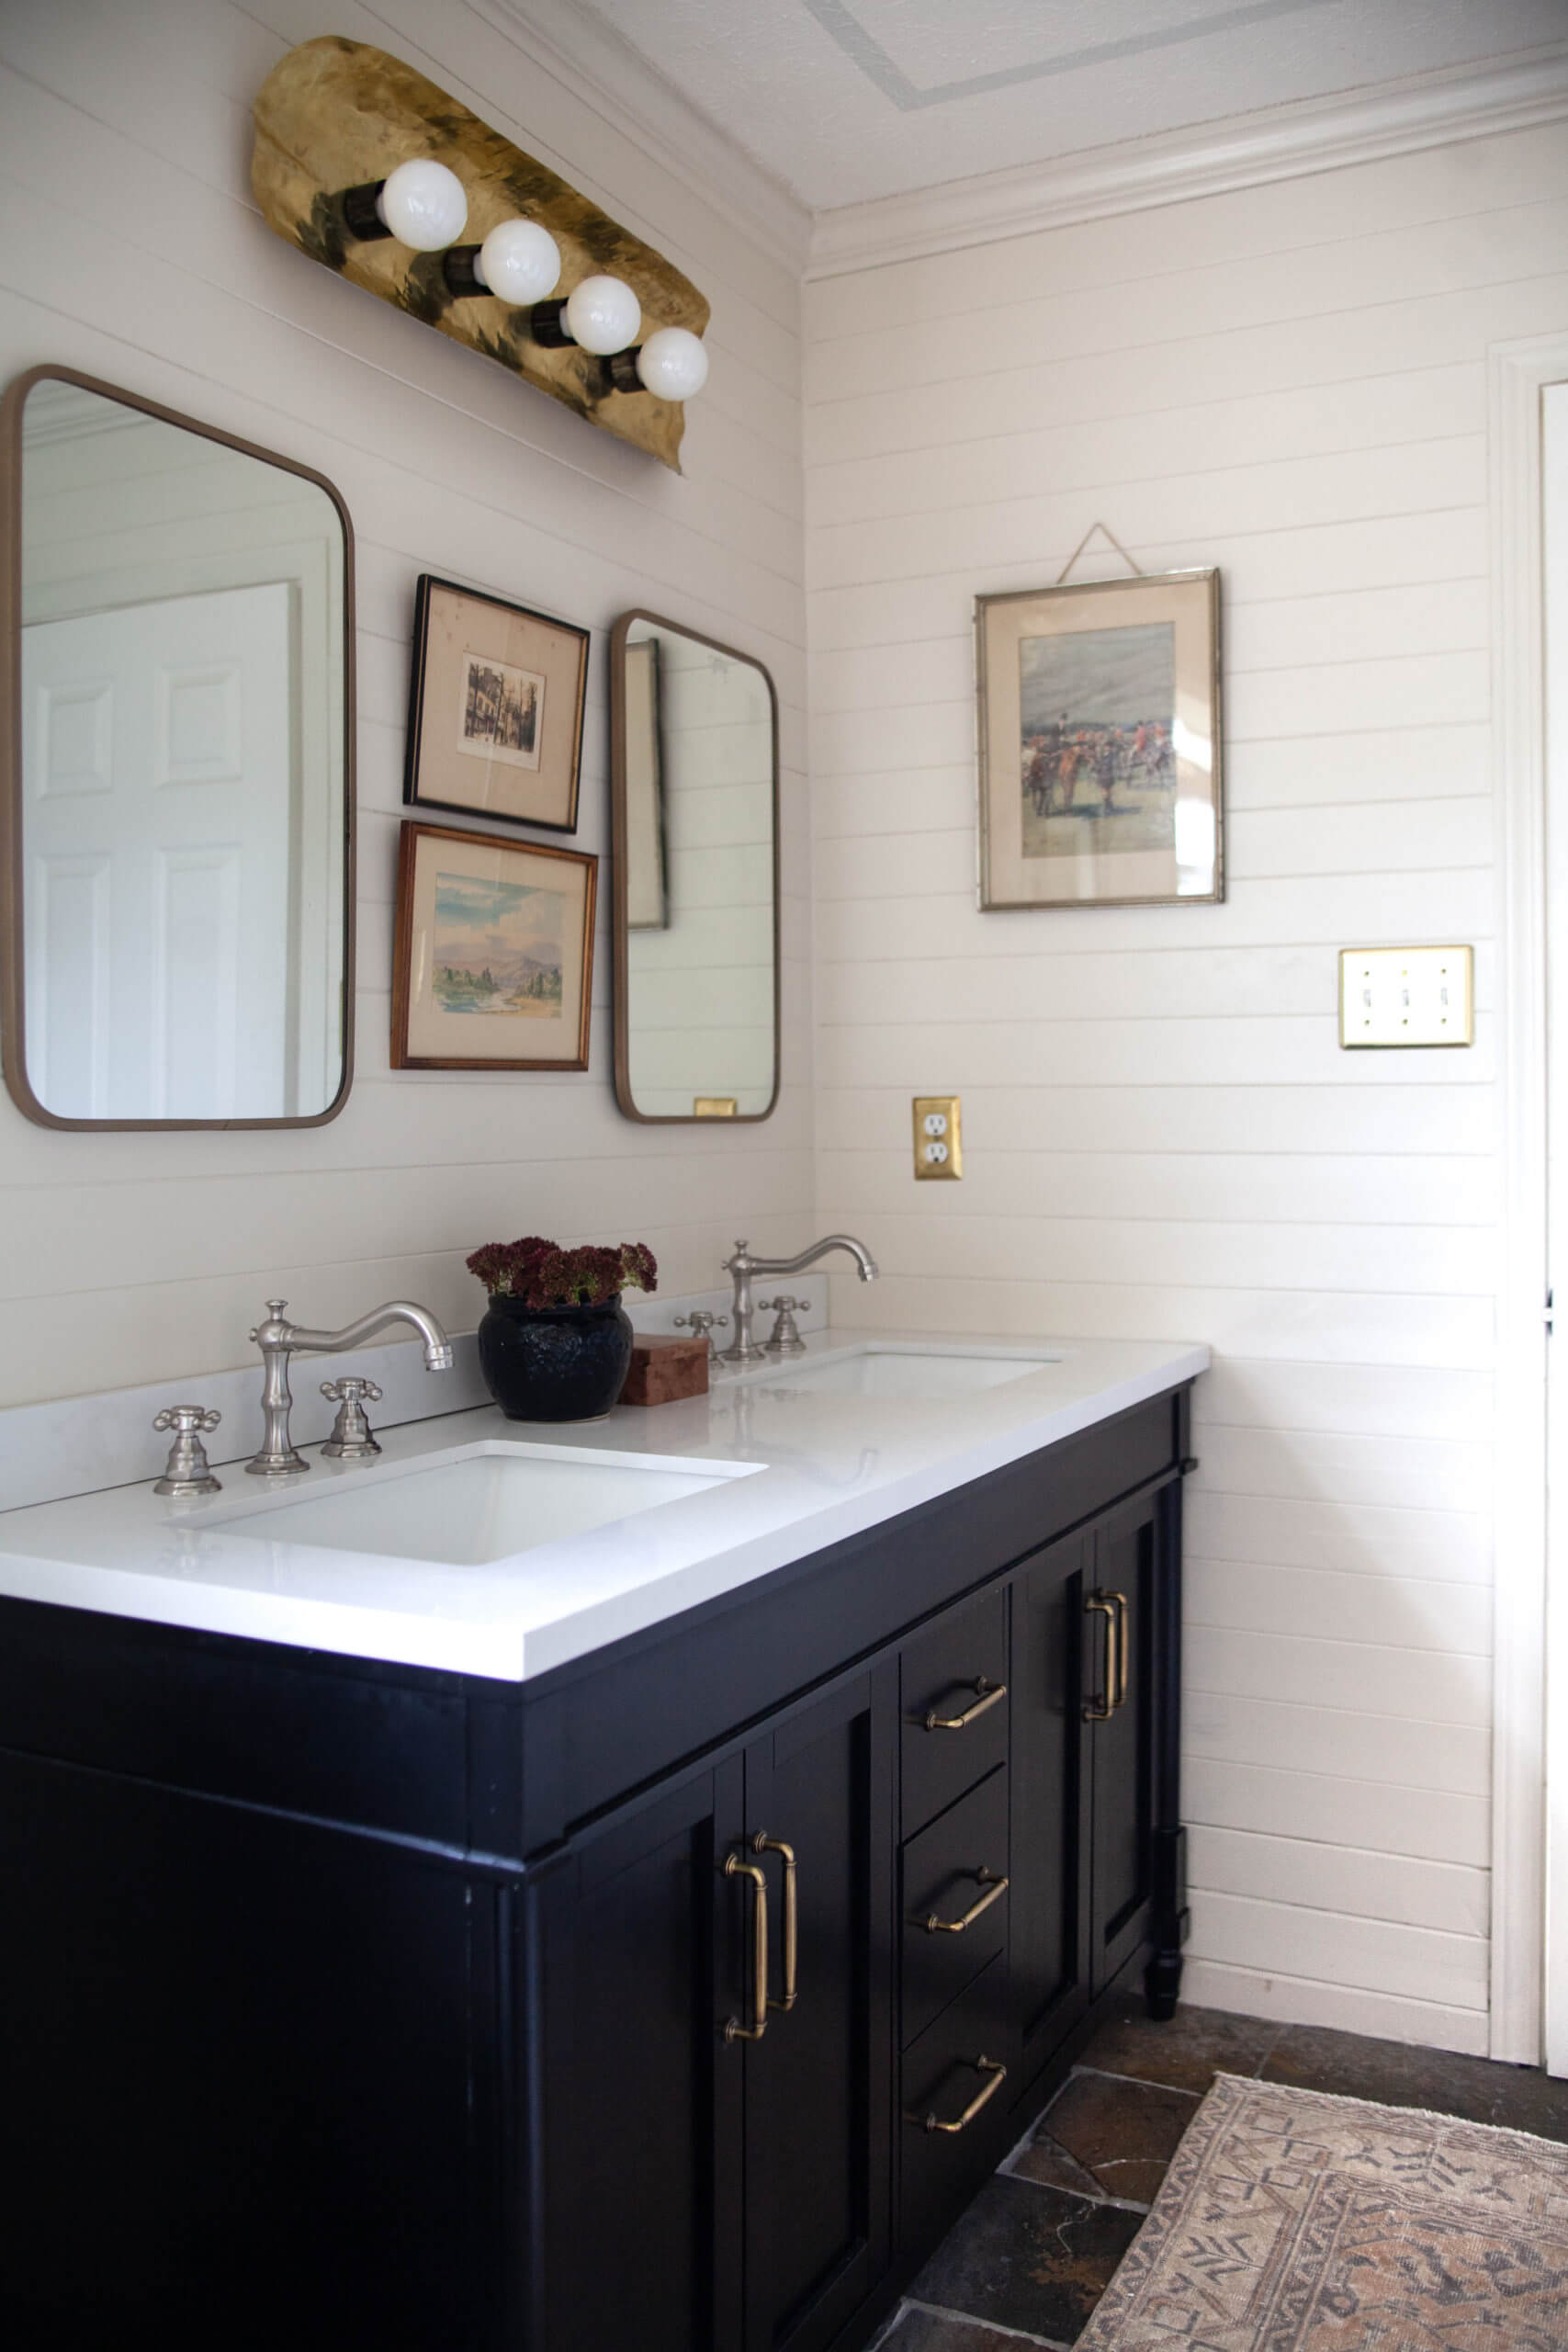
The exciting thing this week is the DIY vanity light that I made! This is the light that I wanted…but it was too small and retailed for $826. So, I decided to try and make a larger version.
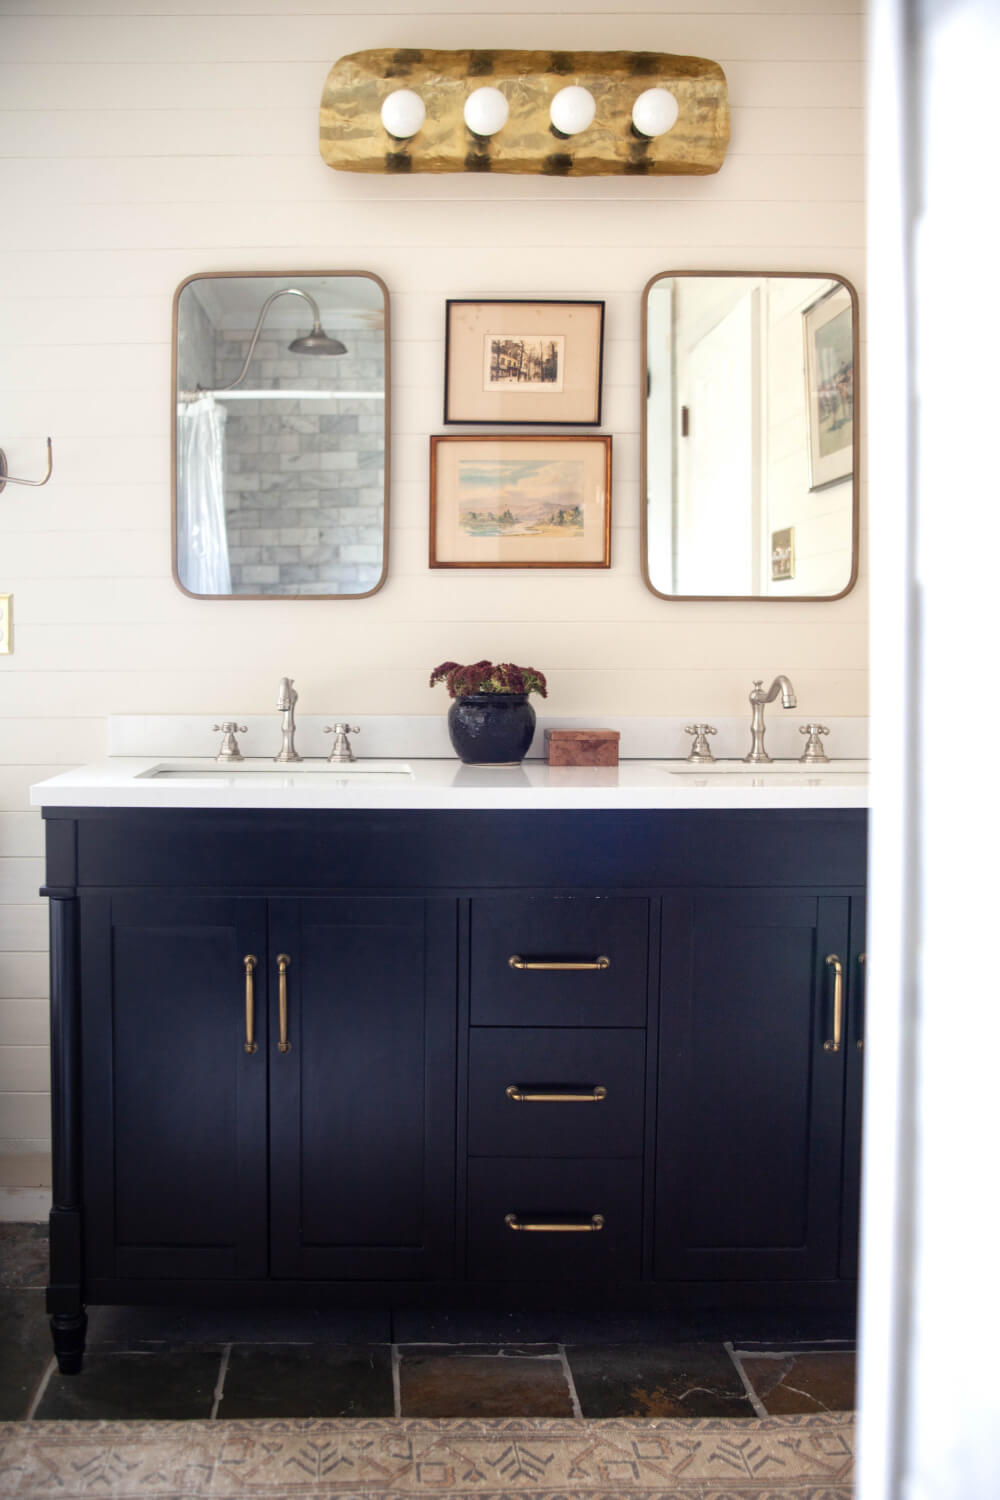
It took some trial and error but I figured it out. My version cost me around $20. That’s a savings of over $800…and mine is larger.
I didn’t take enough pictures for a tutorial, but I have plans to make a similar one over the bathtub. I’ll share how I made it soon.
Besides the paint, I was also struggling with the color of the rug. I just didn’t love it as much in person as I did online. I swapped it with the rug from my entry and I like it SO much more. This rug is a tad too big, but I found a similar one online and it’s on its way. (My fingers are crossed that I like this one since they are all one-of-kind!)
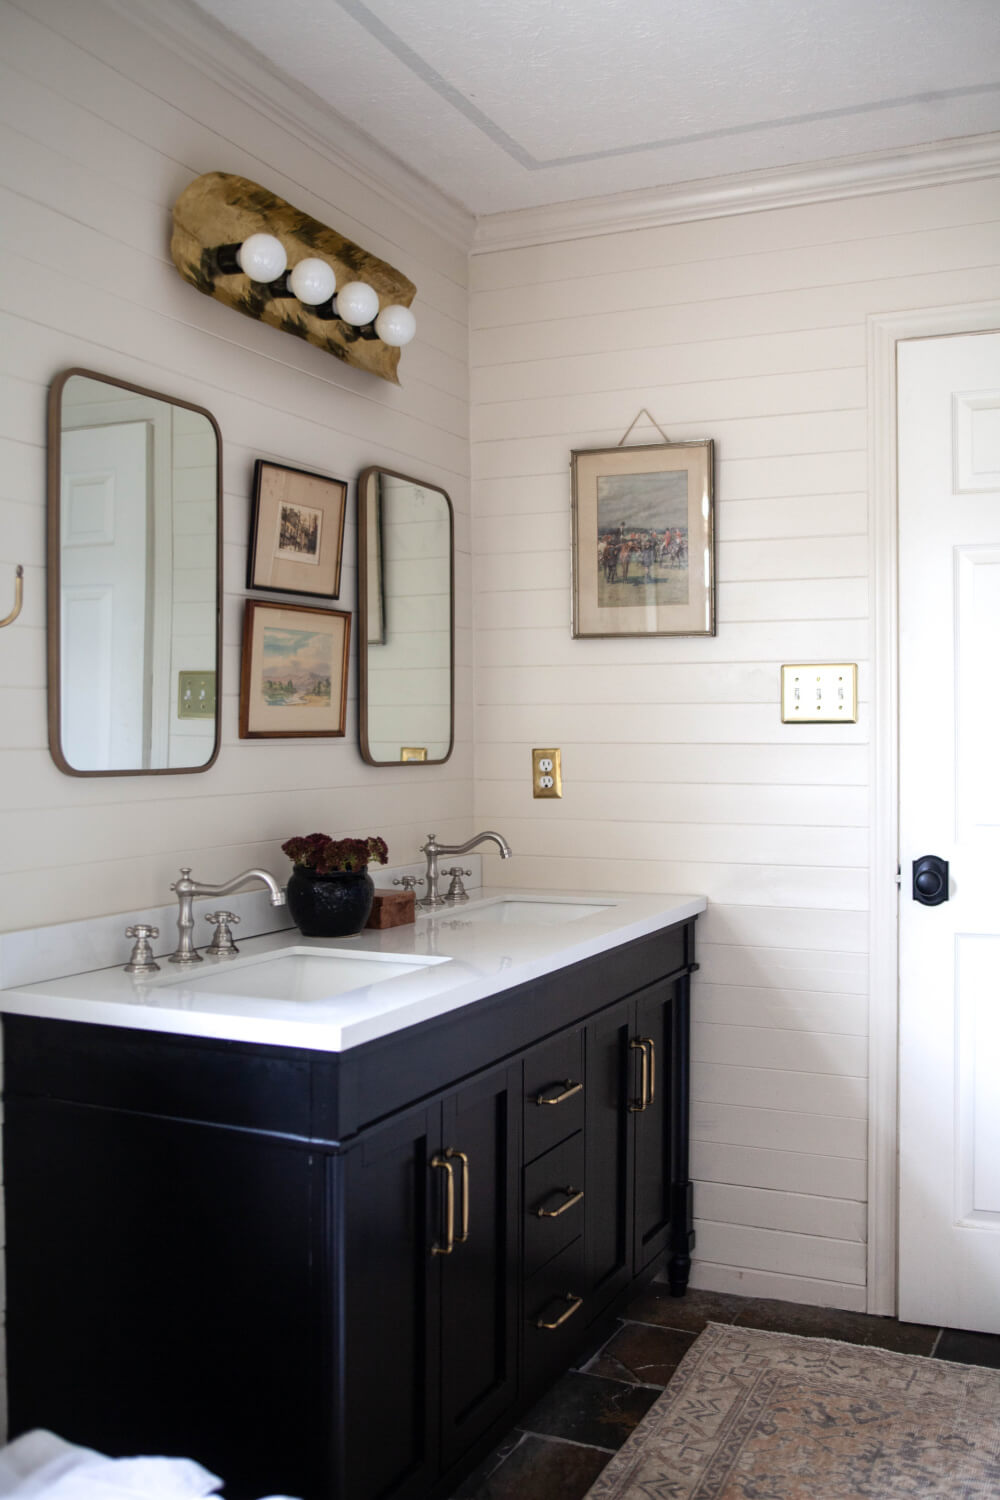
I’m still not sure if the mirrors will stay and the artwork will change…BUT, at least there is some progress.
My to-do list is still pretty long:
- Install ceiling treatment
- Make curtains for shower and window
- Add bathtub details
- Decide on artwork
- Build storage
My goal for next week is to get the ceiling installed. Wish me luck!
Be sure to check out all the other ORC guest participants here.


It’s looking great so far! And what a cool light. 🙂 I bet it looks so glam when it’s on!
Nice! It’s suit for my kitchen
Thanks for everyone’s interesting and useful sharing, I will visit often to find the necessary information.
Understanding the qualifications of a dissertation ghostwriting http://www.baydue.com/store/info?id=5 is crucial. An excellent dissertation writing agency should have a professional and experienced team of writers with relevant academic background, rich writing experience, and good writing skills.
Renovating or redecorating a room can undoubtedly present its fair share of challenges, and choosing the perfect paint color is often one of the most difficult tasks. By the way, I do my essay here https://studyfy.com/ . It’s perfectly normal to experience some hiccups along the way. Sometimes what looks great on a paint swatch or in a magazine doesn’t translate as expected when it appears on the walls of your own space .
Hi there! Securing a cryptocurrency license is crucial for any crypto venture. The requirements differ by country, but usually involve document preparation, verification, and fees. Having a license ensures legal compliance and boosts trust in your project. I recently found a helpful resource that explains all the details and offers necessary guidance. Check out this link for a crypto exchange license https://gofaizen-sherle.com/crypto-license. It provides a wealth of information and contacts for experts who can assist with every step of the licensing process.
duck life is more than just a racing game—it’s an engaging journey where players train, strategize, and compete to create the ultimate champion duck. Whether you’re a new player or a long-time fan, the thrill of training your duck from a beginner to a champion never gets old.
We can see different topics on this page
The current bonuses from Melbet are a great way to boost your chances of successful betting, especially if you’re just starting. These bonuses can provide extra funds for betting, allowing you to try out different strategies without risking your balance.
To make the most of the bonuses, it’s important to carefully read the terms and conditions for activation and use. For example, bonuses may be tied to your first deposit or special offers for active users. By using the Aplicativo Melbet Brasil , you can quickly receive notifications about new bonuses and promotions, which keeps you updated on current offers and helps increase your bankroll.
Os bônus atuais da Melbet são uma ótima maneira de aumentar suas chances de sucesso nas apostas, especialmente se estiver apenas começando. Esses bônus podem fornecer fundos extras para apostas, permitindo que você experimente diferentes estratégias sem arriscar o seu saldo.
Para aproveitar ao máximo os bônus, é importante ler atentamente os termos e condições de ativação e uso. Por exemplo, os bônus podem estar vinculados ao seu primeiro depósito ou a ofertas especiais para usuários ativos. Ao usar o Aplicativo Melbet Brasili , você pode receber rapidamente notificações sobre novos bônus e promoções, o que o mantém atualizado sobre as ofertas atuais e ajuda a aumentar sua banca.
Alcune scelte di design potrebbero essere controverse, ma nel complesso il Superocean Heritage II offre tutto ciò che ci è piaciuto del Superocean Heritage I, con rolex replica materiali più moderni e, nel caso della versione a tre lancette, un nuovo movimento.
And I just know they’re dreamy!
That sounds like such a satisfying DIY win — saving hundreds and still ending up with something even better (and bigger!) is the best feeling
Love the update on paint and the vanity light — your notes on how finishes read under different bulbs are really helpful. If you want a quick way to visualize color blocking or fixture placement before committing, I sometimes make low-fi pixelated mockups with Online Pixelator to get a feel for contrast and balance.
Uvijek volim isprobavati nove slot igre pa sam zato odlučila vidjeti što nudi BigClash i bila sam iskreno oduševljena brojkom koja prelazi osam tisuća naslova. Sve radi vrlo brzo pa se može prebacivati između različitih igara bez čekanja što mi je jako bitno jer volim dinamiku tokom igranja. Pretražujući dodatno pronašla sam stranicu bigclash-hr.com koja mi je dala korisne informacije o providerima i kategorijama igara. Posebno mi je drago što imaju i klasike i nove Megaways naslove pa se mogu igrati potpuno različiti stilovi. Smatram da je ovo idealna platforma za sve ljubitelje slotova koji žele veliku raznolikost i stabilno iskustvo.
Among the online gaming platforms I’ve tried, Mahadev Book is one of the best. Setting up my Mahadev Book ID was effortless, and the Mahadev Book Login is quick and secure. The platform runs smoothly, and the Mahadev Book App makes it easy to play and track games on the go. Highly recommended for anyone seeking a reliable and user-friendly gaming experience: https://mahadevbook.co.in/
A fully equipped kitchen that is attractively organized and designed. I truly enjoy such kitchens. Wacky flip Io Game.
Choosing bold colors can feel overwhelming, much like how celebrities refresh their homes for lifestyle shoots. I found inspiration by checking celebrity style updates beet-brüder henrik getrennt, which helped me narrow shades confidently.
Loving the progress! The paint and new vanity light look fantastic — such a great transformation so far. Can’t wait to see the final reveal!
Cricbet99 is a user-friendly platform for cricket, football, and other sports fans. It offers live match updates, easy registration, and simple account management. While independent and not connected to official sports bodies, it provides a smooth and secure experience. A great option for sports enthusiasts looking to stay updated. Check it out: https://cricbet99india.com/
I enjoyed following this progress update because it really shows how thoughtful lighting choices can completely change a space. The way you balanced paint tones with vanity lighting made the room feel more finished and intentional, not rushed. I’ve noticed the same thing with detailed projects at home—lighting is what brings all the effort together. That attention to detail is one reason I appreciate setups like the lego millennium falcon light kit, where lighting highlights every feature instead of overpowering it. Whether it’s a renovation or a creative build, good lighting adds depth, warmth, and that final polished touch that makes the work feel complete.
I want to applaud you for the helpful information you provided in this post. Play Moto X3m racing game
This is looking so good! I love how the paint color turned out — it feels so soft and cozy. And that DIY vanity light is seriously amazing… I can’t believe you made it for $20! Can’t wait to see the final reveal! ✨
This is looking so good already! I totally feel you on the paint struggle — it never looks the same on the wall
Okay that DIY vanity light is genius I’m honestly shocked you made it for only $20!
I love how soft and cozy the final color turned out. It makes the whole space feel way calmer.
Such a fun update! I’m really excited to see the ceiling treatment — I bet it’s going to take it to the next level
thans for sharing this such an amazing content i love it really
Choosing the right paint color can be such a challenge! It’s great to see your determination in mixing samples to find that perfect shade. If you’re looking for something fun to unwind with, check out this addictive game: スイカゲーム. Good luck with the rest of your makeover!
Every major airport has its own atmosphere, and JFK feels like a true global crossroads. I often share new-york-jfk-international-airport.com with friends planning international trips because it gives a clear overview of what to expect. My own experience matched the descriptions, from terminal layouts to available services. The airport combines efficiency with the energy of New York itself. While it is always busy, it rarely feels chaotic when you know the basics. Good information turns a complex place into a familiar one.
Thanks for sharing this great material; I love it a lot.
The social aspect of gaming is being reimagined through the integration of live dealer rooms that accept cryptocurrency for real time interaction. These rooms allow players from across the globe to compete at the same table while communicating via live chat. For a list of the best live dealer experiences available to Bulgarian users check https://bulgaria-crypto.casino/pregledi-na-kripto-kazino-2025/ today. About 40 percent of the bets in the Bulgarian market are now placed by women reflecting a broader and more diverse user base. This shift is encouraging developers to create a wider range of themes and social features within their games. The community element is proving to be a powerful tool for building brand loyalty in a crowded space.
it shows how patience and small steps make a big difference — just like keeping important things organized in life, whether it’s home projects or essentials like an Ayushman Card so they’re easy to find when needed. Looking forward to seeing the final reveal!
The Consulta ruc consultation allows you to verify official data, tax status, tax domicile and legal validity of individuals and companies registered in public administrative registries of the Peruvian tax system.
M666 Game is a popular mobile casino platform where players can enjoy exciting card and slot games anytime. It offers smooth gameplay, a simple interface, and fast access on both Android and iOS devices. Many players like it because it provides daily rewards and entertaining game modes. The app is designed for people who enjoy casual gaming and trying their luck online. With its growing popularity, M666 Game has become a trending choice among mobile casino game fans
Really enjoyed this post, you explained the topic clearly and it was easy to follow. I bookmarked it for later. On a related note, I recently found https://emojitranslator.cc/ while looking for ways to make my social media posts more fun. It converts text to emoji and back, which has been pretty useful. Great blog, looking forward to reading more from you.
Very helpful information! Tools like Consulta RUC are really important for verifying official data and ensuring transparency in the tax system. Thanks for sharing this.
Love the bathroom progress and that incredible DIY vanity light! Saving $800 is amazing. If you need help visualizing future lighting designs or creating project mood boards, try this AI tool: Image to Prompt. It can turn your DIY ideas into visual references. Can’t wait to see the ceiling install
Nice post, thanks for sharing. Been looking for something fun to play during breaks and found this stealth puzzle game where you sneak through a teacher’s house setting up pranks. Simple controls, no install needed, just play in the browser. The site is https://scaryteacher.com/ if anyone wants to give it a shot.
Love seeing the progress on your bathroom makeover — the DIY vanity light is such a clever and inspiring project! For anyone who wants to pair their music with stunning visuals, Music to Video is a fantastic AI tool that can help create cinematic videos to go along with any track.
I tried installing this yesterday after hearing about it from someone, so I searched around for it. Took a bit of time to find the right file, then I saw it was jio lottery apk. Installed it and opened it once. Everything looked normal, no issue. I didn’t really use it much after that, just checked a few things and left it.
great post
I have spent years on the floor and online watching how different players approach the reels. The most successful ones are those who study the paytables before they even place a single credit. If you visit https://burninghot-pacanele.ro you will see that the 40 burning hot version offers a different experience than the classic five line game.
This post is solid, learned a lot from it, thanks for sharing. Really enjoyed this post, you explained the topic clearly and it was easy to follow. webharmonium
I recently started using Cricbet99, and the experience has been very smooth and professional. The Cricbet99 login process is quick, and the account setup takes only a few minutes, which is perfect for new users. The platform design is clean, responsive, and easy to navigate on both desktop and mobile devices. Getting a Cricbet99 ID is simple, and the overall system feels secure and reliable. Whether you choose Cricbet99 or Cricbet 99 for sports and casino-style gaming, the performance remains consistent. The Cricbet99 App also adds extra convenience, allowing access anytime and anywhere. Definitely a trusted option for anyone looking for a safe and user-friendly betting platform.
Thanks for sharing this helpful guide. I’ve had a smooth experience with Reddy Anna Book, especially with fast ID activation and secure transactions. The Reddy Anna Club benefits add extra value, making Reddy Anna a dependable platform overall.
Very helpful information! Tools like Consulta RUC are really important for verifying official data and ensuring transparency in the tax system. Thanks for sharing this. kolkata fatafat is a fast-paced number game where players choose digits and wait for frequent results announced throughout the day. its simple format and quick outcomes make it popular among those seeking instant entertainment. many try to follow patterns or past charts, but there is no guaranteed way to win. it should be enjoyed in moderation, with proper limits and awareness to avoid financial loss or unhealthy dependence.
One of the best features of MPTAAS is transparency. Students can track their application status online without depending on anyone else.
Mr. Flip is a physics-based 3D arcade game where you control Mr. Flip, a rag doll character, performing somersaults and landing perfectly on target areas.
Want to get started with Dicero faster? Check https://dicero.app for skill archetypes, weapon categories, redeem codes, and beginner-friendly answers.
Love what you did with the vanity light! The DIY approach saved so much and looks fantastic. For anyone working on home renovation content, tools like video2x can really help enhance video quality for before-and-after comparisons. Great progress on the ORC!
Great news on maintaining the Fairtrade Status!
Wave Rider gives you just enough time to think, but not so much that you ever feel bored.
The DIY vanity light is incredible, especially considering the cost difference! It’s always satisfying when a custom project turns out even better than the original inspiration. Choosing paint colors can be surprisingly difficult, but the final result looks great. As with fnaf
sometimes a lot of trial and error leads to the best outcome. Can’t wait to see the completed makeover!
I enjoyed reading this article. Website Development Services in Abu Dhabi City from Digital Solution 360 seem like a great option for modern businesses.